Chapter 6 — Multitrack Looper (rnbo~)
This rnbo~ patcher is quite similar to our Multitrack Looper in Max. We have put it all together in rnbo~ to leverage rnbo~’s ability to export the patcher to different targets. To achieve this, we have also done a few different things than in our other rnbo~ chapters, for example, instead of using external messages at the top level of our Max patch, we have tried to include all but our Live UI objects within the rnbo~ patcher. The main difference you will notice is the RNBO set operator, which is used when we want to send parameter values and attribute settings, to gen~ subpatchers or parameters to an rnbo~ object.
The Basics: Reset, Record, Play, Stop
(Example Patcher: 6-1-Reset-Record-Play-Stop)
The three RNBO operators at the core in this patcher are record~ (for recording), groove~ (for playing/looping), and data for storing audio data.
Note: For this chapter, and the RNBO-based looper we will build in the next chapter, we use a data operator with an attribute @external 0 to make it local to the rnbo~ patcher instead of a buffer~ operator. The data and buffer~ operators are similar, but some differences exist. We recommend reading their shared helpfile to see how they differ.
As with the multitrack looper we created in Chapter 2, we’ll need to include patching that supports the basic elements we’ll need for this looper:
- The ability to record and store our loop
- The ability to play a stored loop back
- The ability to stop recording and enable playback
- The ability to reset our looper when needed.
Our patcher includes the expected in~/out~ operators for audio, as well as an in operator to handle input from our UI in the parent patch. You’ll note that the groove~, record~, and data operators all share a name so they can work together. We have enabled looping for the groove~ operator using the @loop 1 attribute. In addition, we have set a maximum memory size as an argument for our data operator and added the attribute @external 0 to make its contents local, i.e., invisible outside of the rnbo~ patcher.
Moving all the commands associated with controlling our looper into values or settings inside the rnbo~ object will make our patcher more visually complex in its connections. However, if we break it down into a sequence of operations and use a trigger (t) to help arrange the messaging and order of the messages, we can create a clearer version of our patcher.
For “reset,” we send the following messages in order (reading the trigger operator from right to left:
- Send a bang message to the set operator to stop playback with groove~
- Send a 0 to the record~ operator to cease recording
- Send a bang message to the onebang operator to reset the timer operator
- Send a bang message to the set to clear the contents of the data operator
- Send 1 to the sig~ 1 operator (this makes sure the speed of playback is normal)
For “record,” we send the following messages in order :
- Send a bang message to the set operator to stop playback with groove~
- Send a bang message to the set to clear the contents of the data operator
- Send a bang message to enable the timer operator
- Send 1 to the sig~ 1~ operator to enable recording
For “play,” we send the following messages in order :
- Send 0 to the record~ operator to turn off recording
- Send a bang message to the timer operator to stop timing, and send the timer operator’s output value to set the endpoint of the groove~ operator
- Send a bang message to the groove~ operator to start playback
To “stop” we:
- Send a bang message to the set stop operator to stop playback with groove~
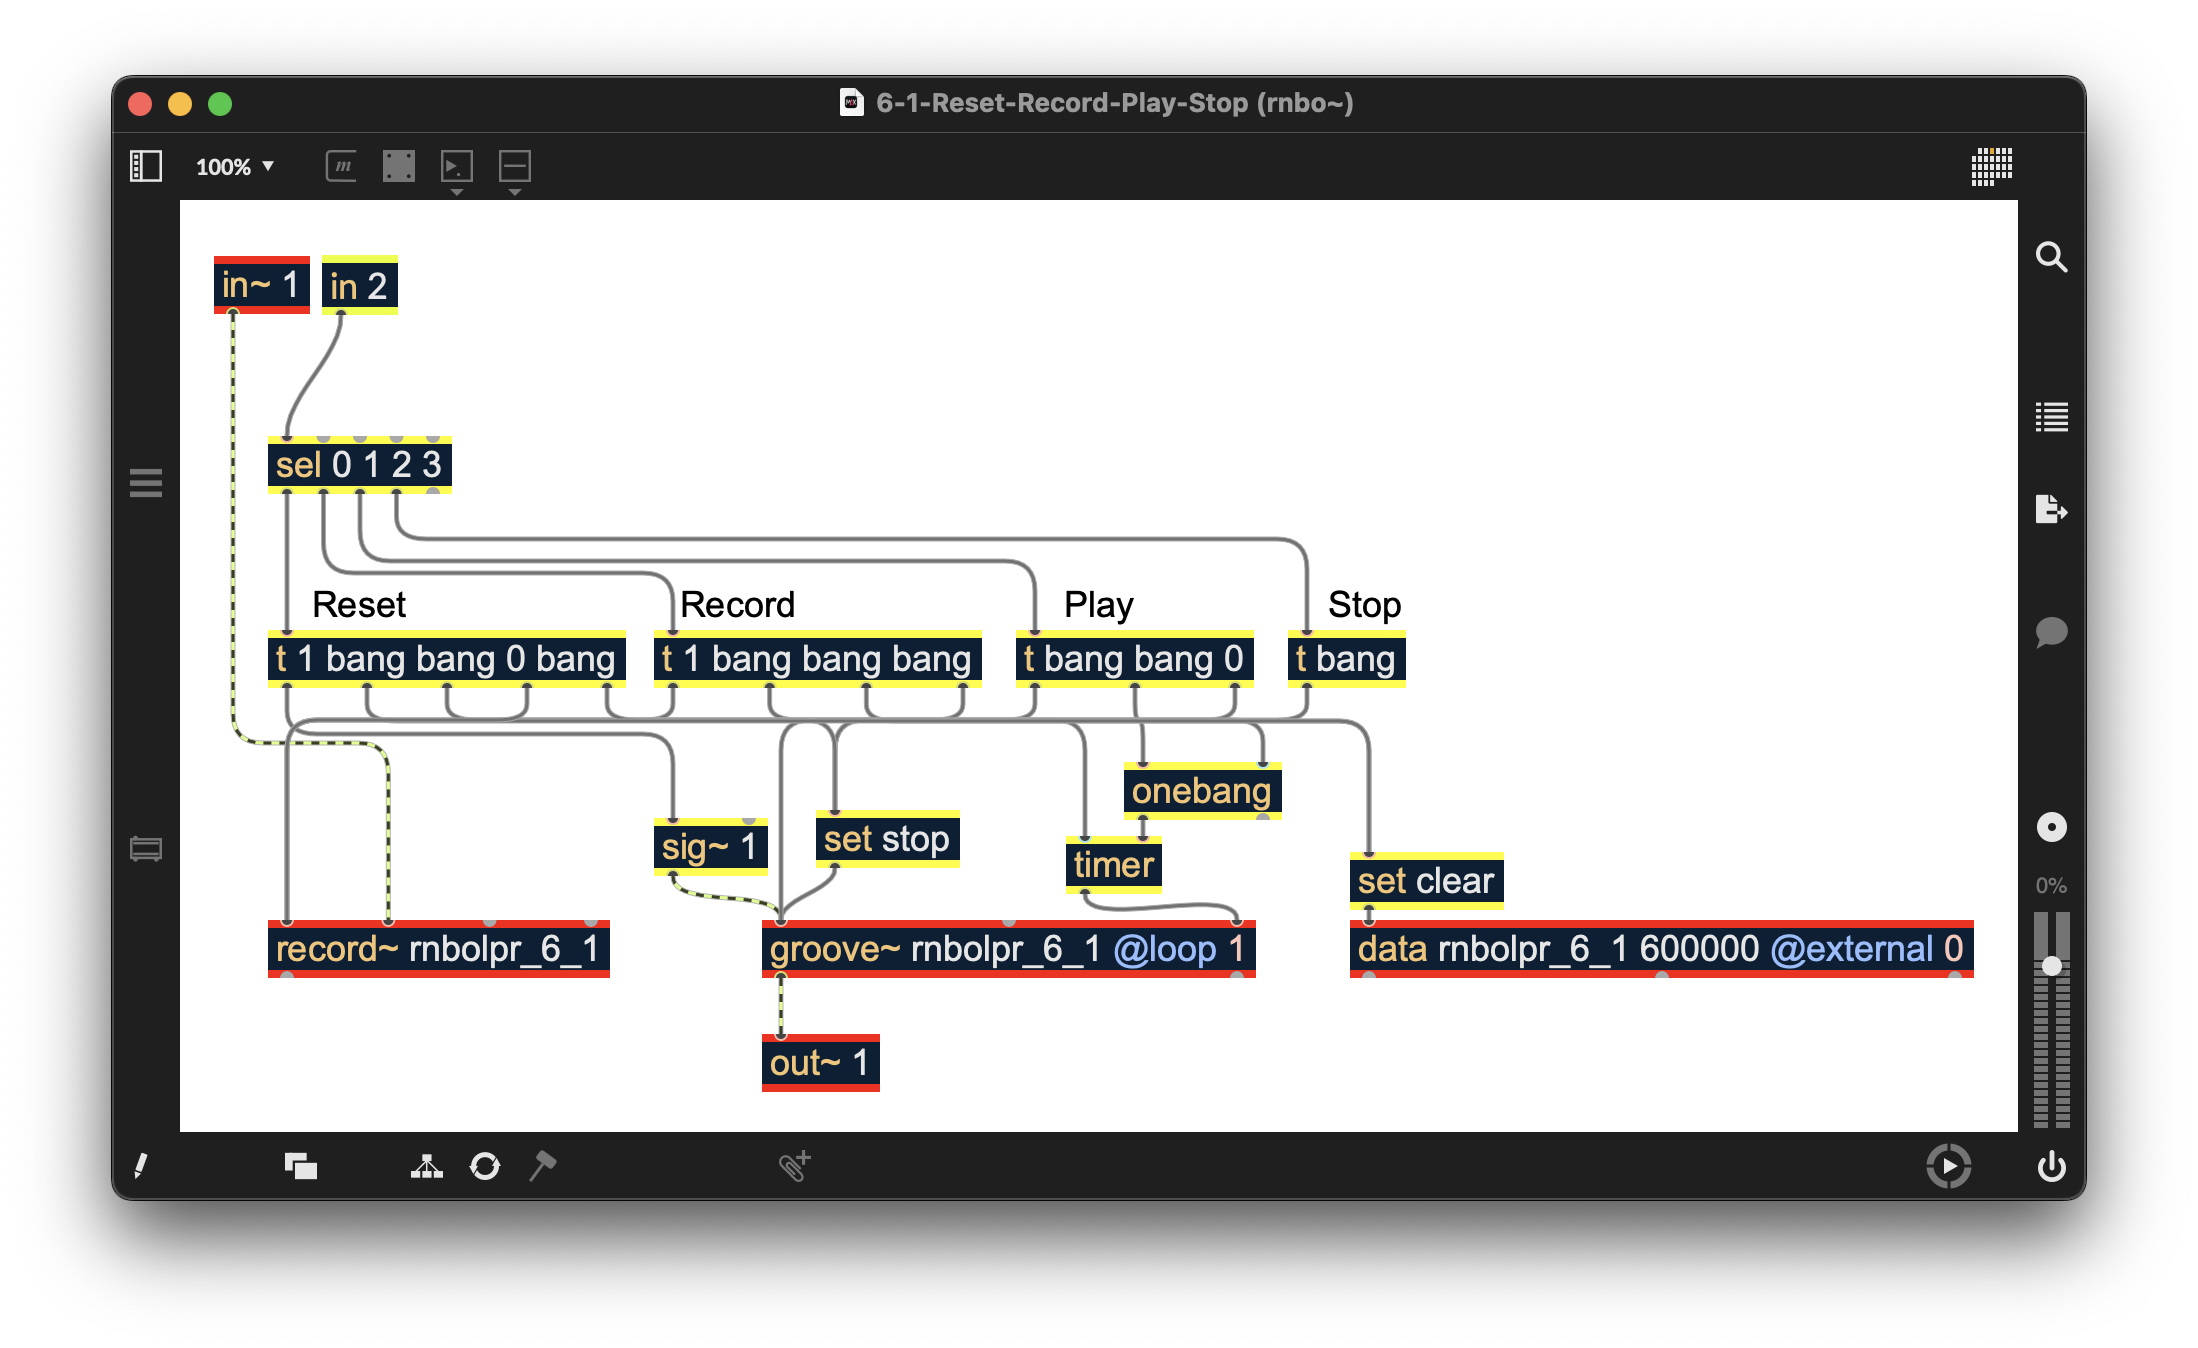
Figure 6-01
Although this reorganization of the rnbo~ patcher may look a little more complex than the patcher in our previous chapter, these changes let us create a much cleaner interface in our parent patcher, which uses a single live.tab object to control the rnbo~ patcher.
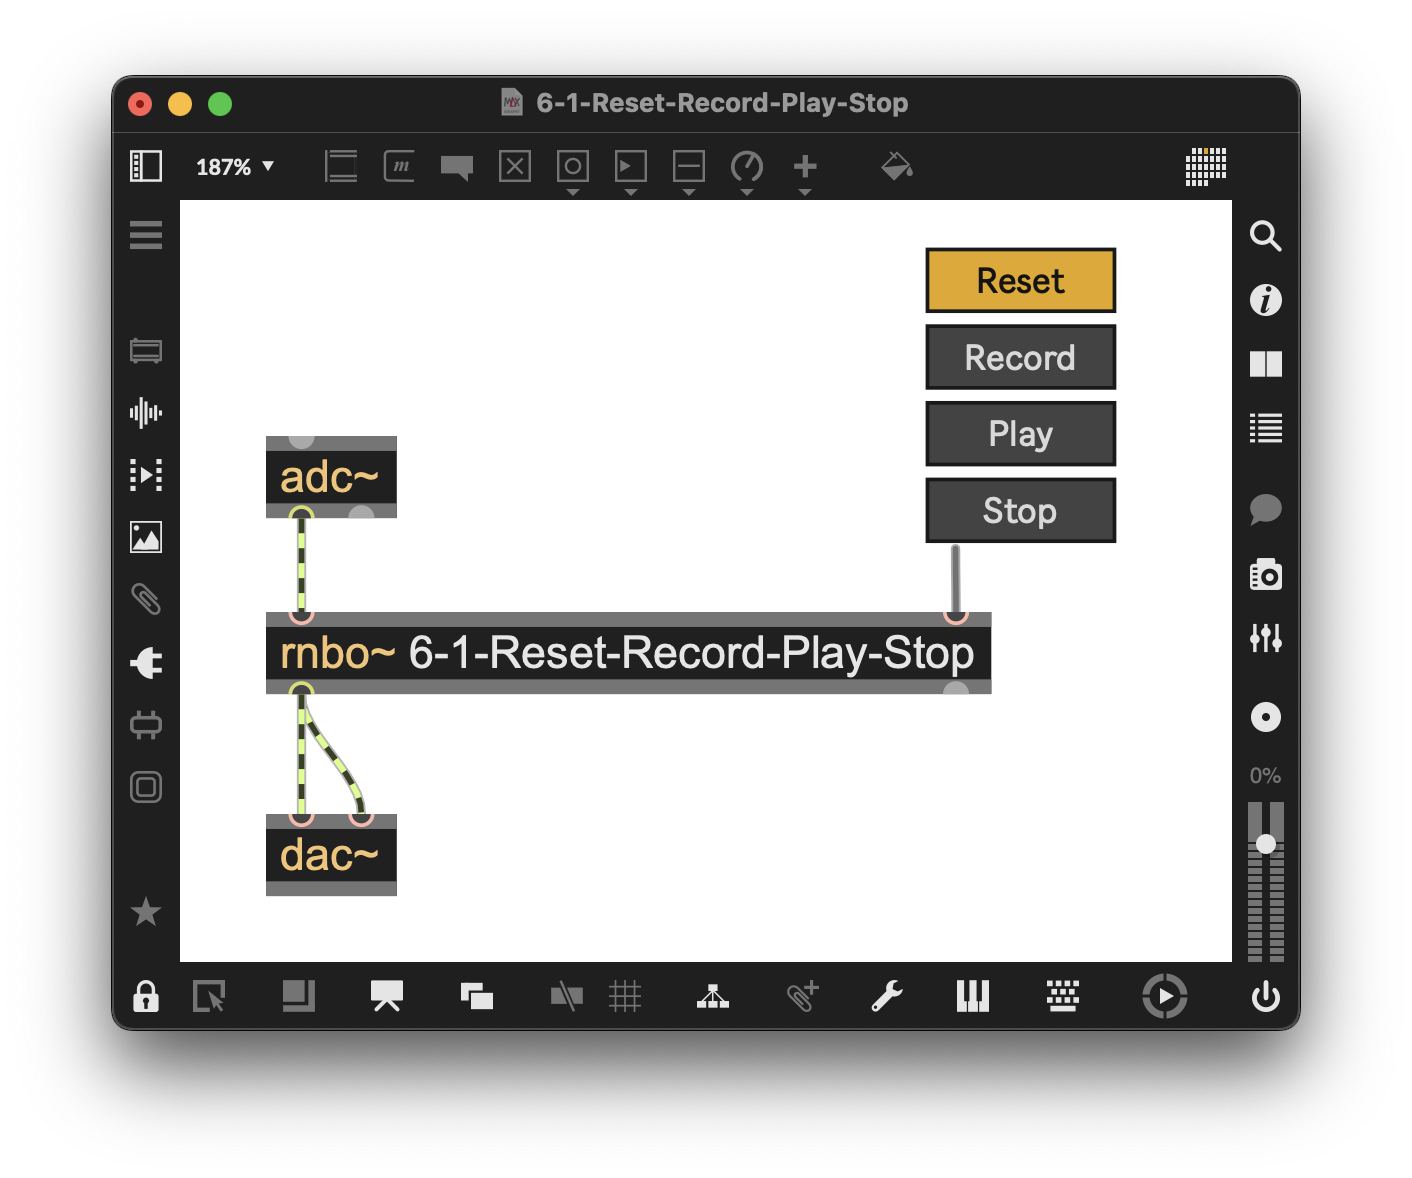
Figure 6-02
Changing playback speed and direction
(Example Patcher: 6-2-Speed-Direction)
As we did when patching our multitrack Looper in Max in an earlier chapter, we’ll add speed and direction control to our RNBO looper using the groove~ operator; all we need to do is to change the value we send to the sig~ operator connected to the first inlet of the groove~ operator. Values between 0. and 1.0 slow down the playback, a value of 0. Stops playback, numbers greater than 1.0 speed up playback, and negative values function similarly but with playback reversed. To support changing the playback speed, we added an in 3 operator inside the rnbo~ patcher whose value passes through a pack f 150 operator, setting the timing for the line operator to smooth values out before changing the value of the sig~ operator.
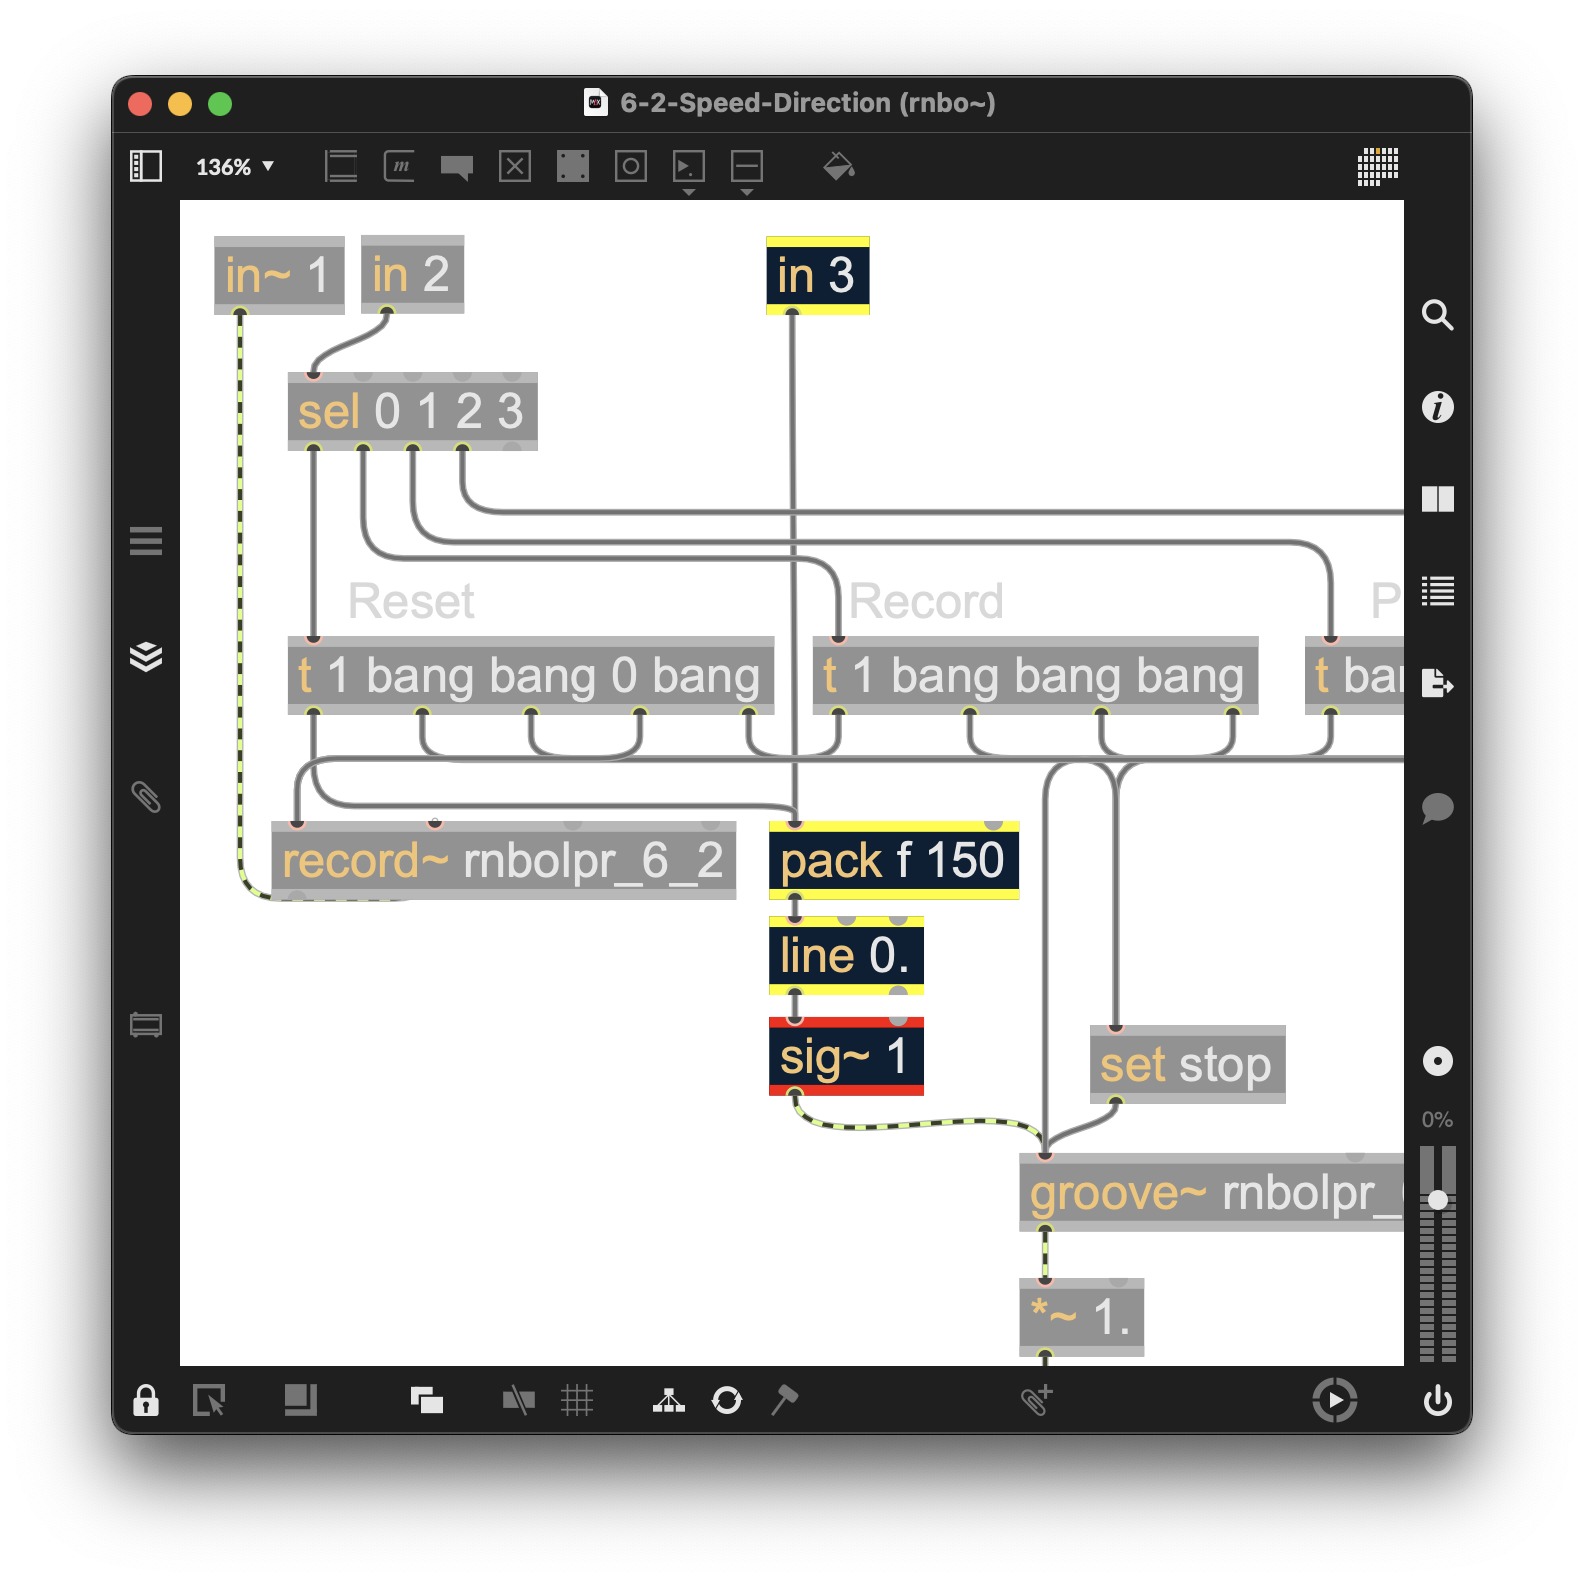
Figure 6-03
We control the playback rate in the parent patcher by adding a live.dial operator whose range (-5.0 - 5.0) and initial value (1) are set using the live.dial operator’s Inspector. To ensure that resetting our patcher will reset the playback speed to 1.0, we have added a sel 0 and t init object pair.
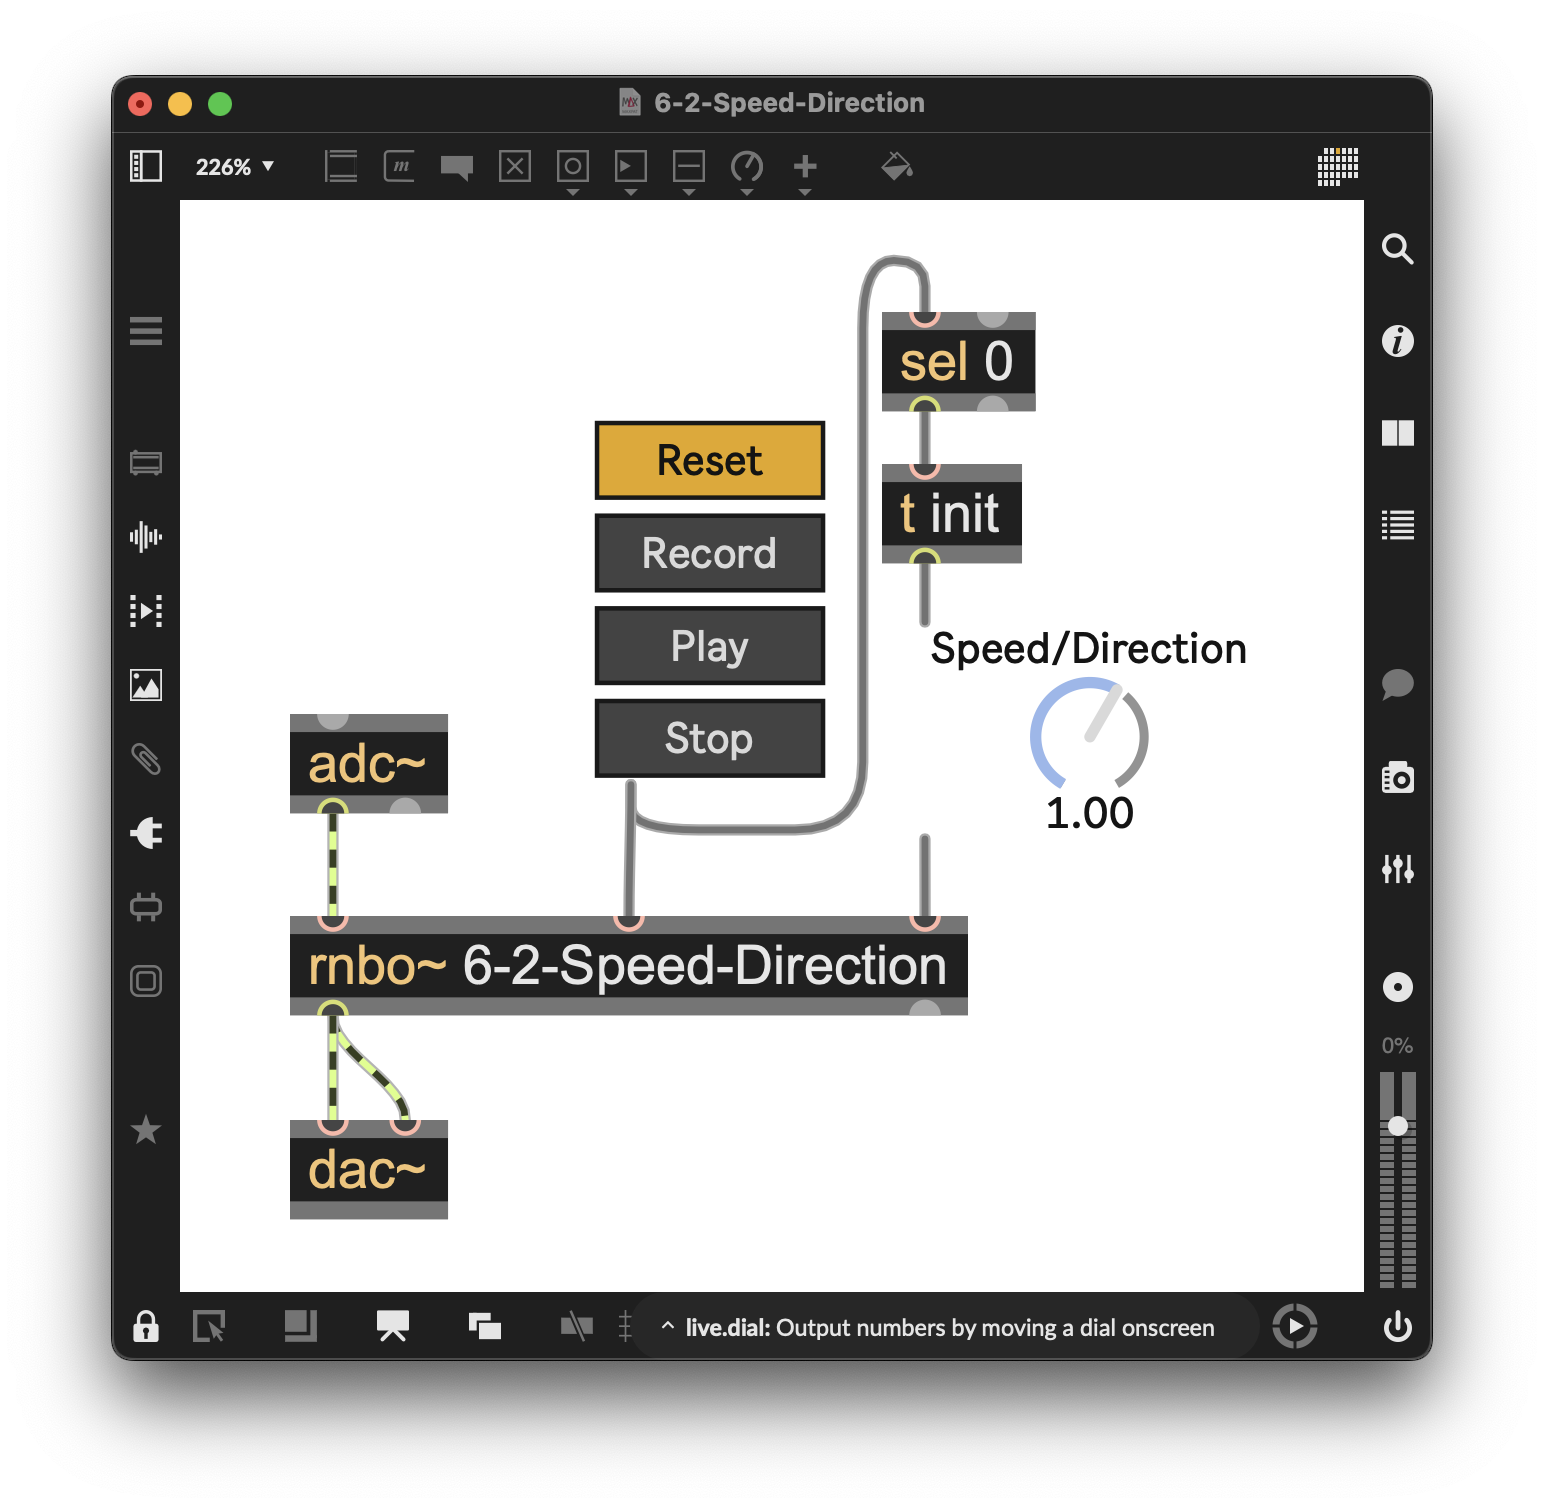
Figure 6-04
Declicking
(Example Patcher: 6-3-Declicking)
As we did when patching our multitrack Looper in Max earlier on, we will again use the RNBO trapezoid~ operator for declicking our output. As with the MSP version of the groove~ object, the rightmost outlet of the groove~ operator sends out a signal to synchronize other objects. We will use that output with the trapezoid~ operator to create a ramp-up at the beginning and a ramp-down at the end of the loop playback, shaping the amplitude output of our looper. (Later in this chapter, we will use the same sync signal to align the playback of multiple tracks.)
We’ll add two in and sig~ object pairs to our RNBO patcher to allow us to set the values of the trapezoid~ operator externally.
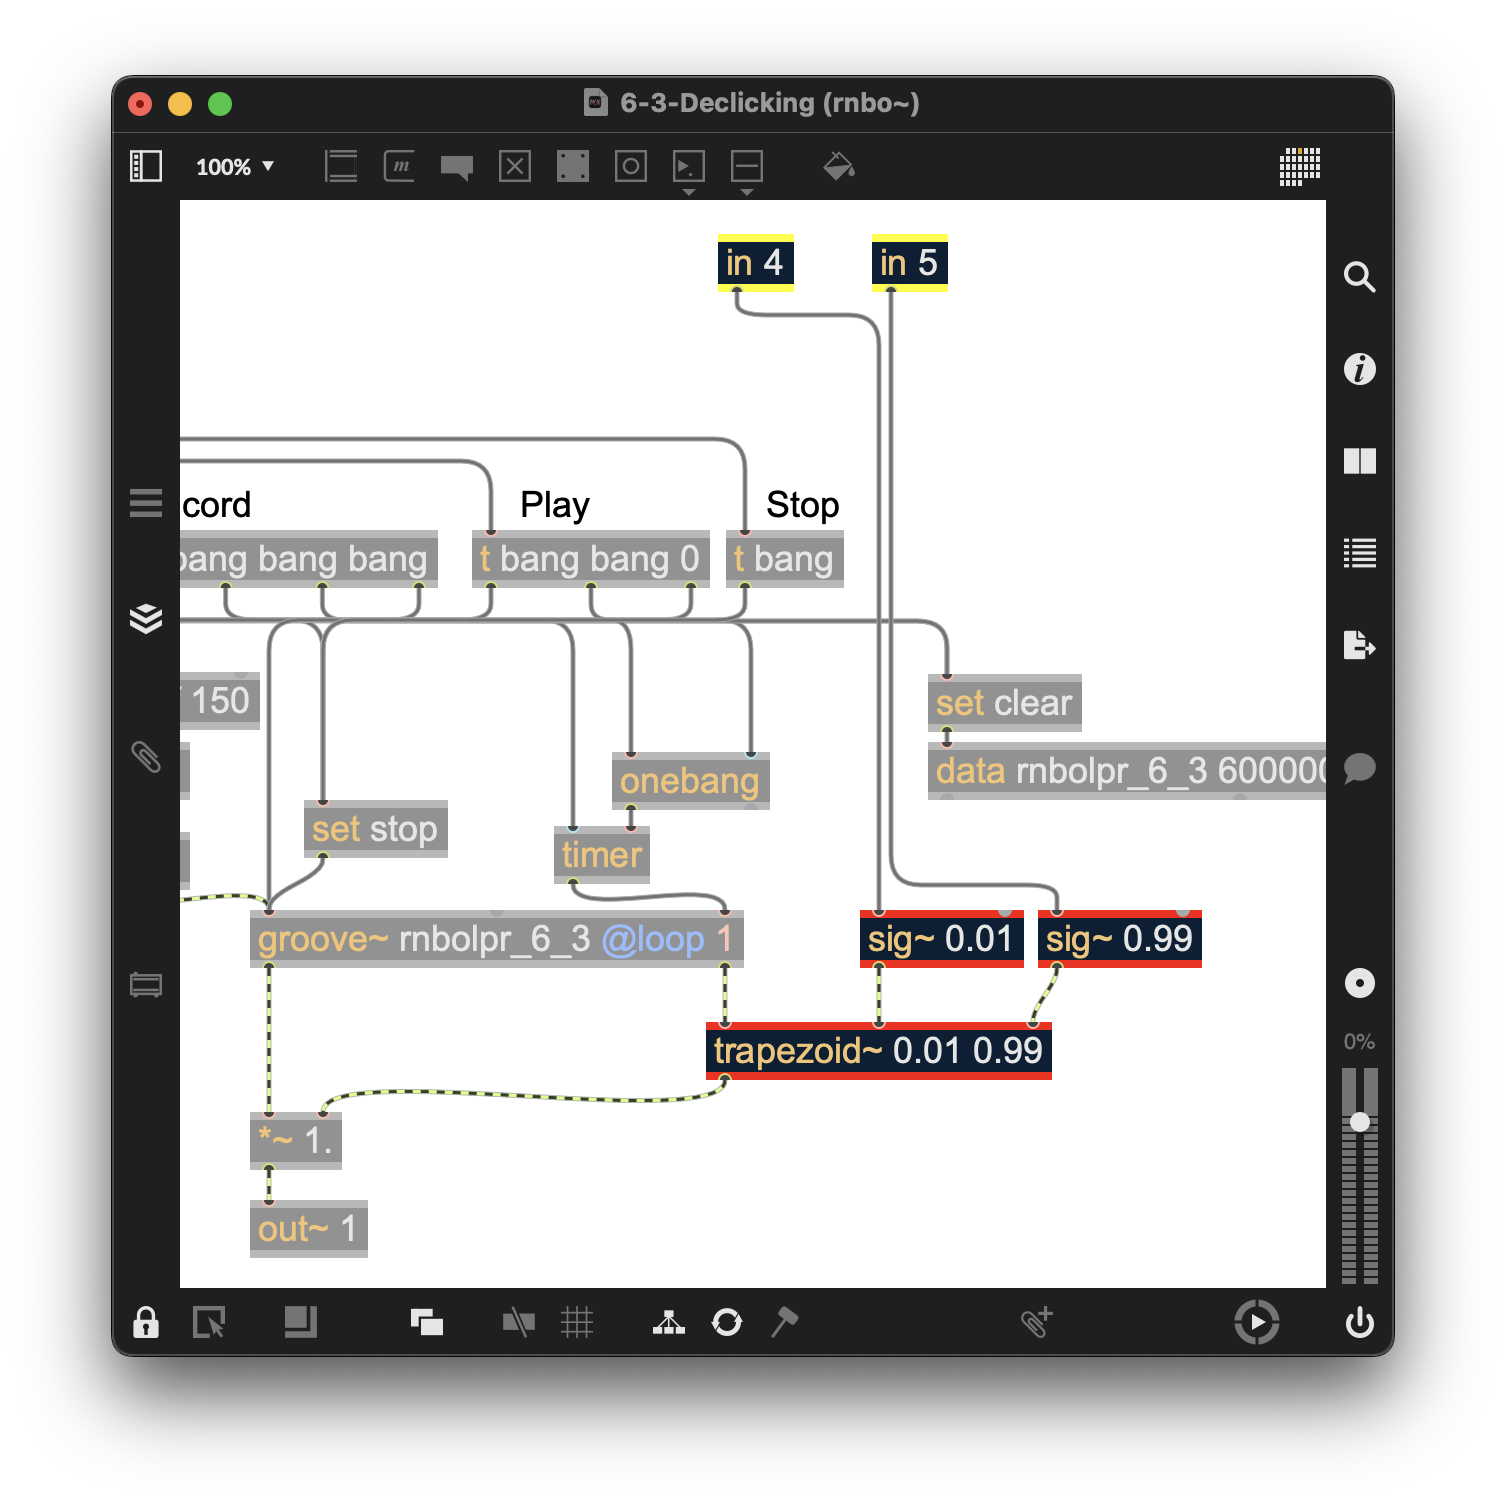
Figure 6-05
In the parent Max patcher, we’ll add two live.dial objects to control the up and down ramps, and connect the output of the t init object so that resetting our looper will also return the up and down ramp values to their default settings.
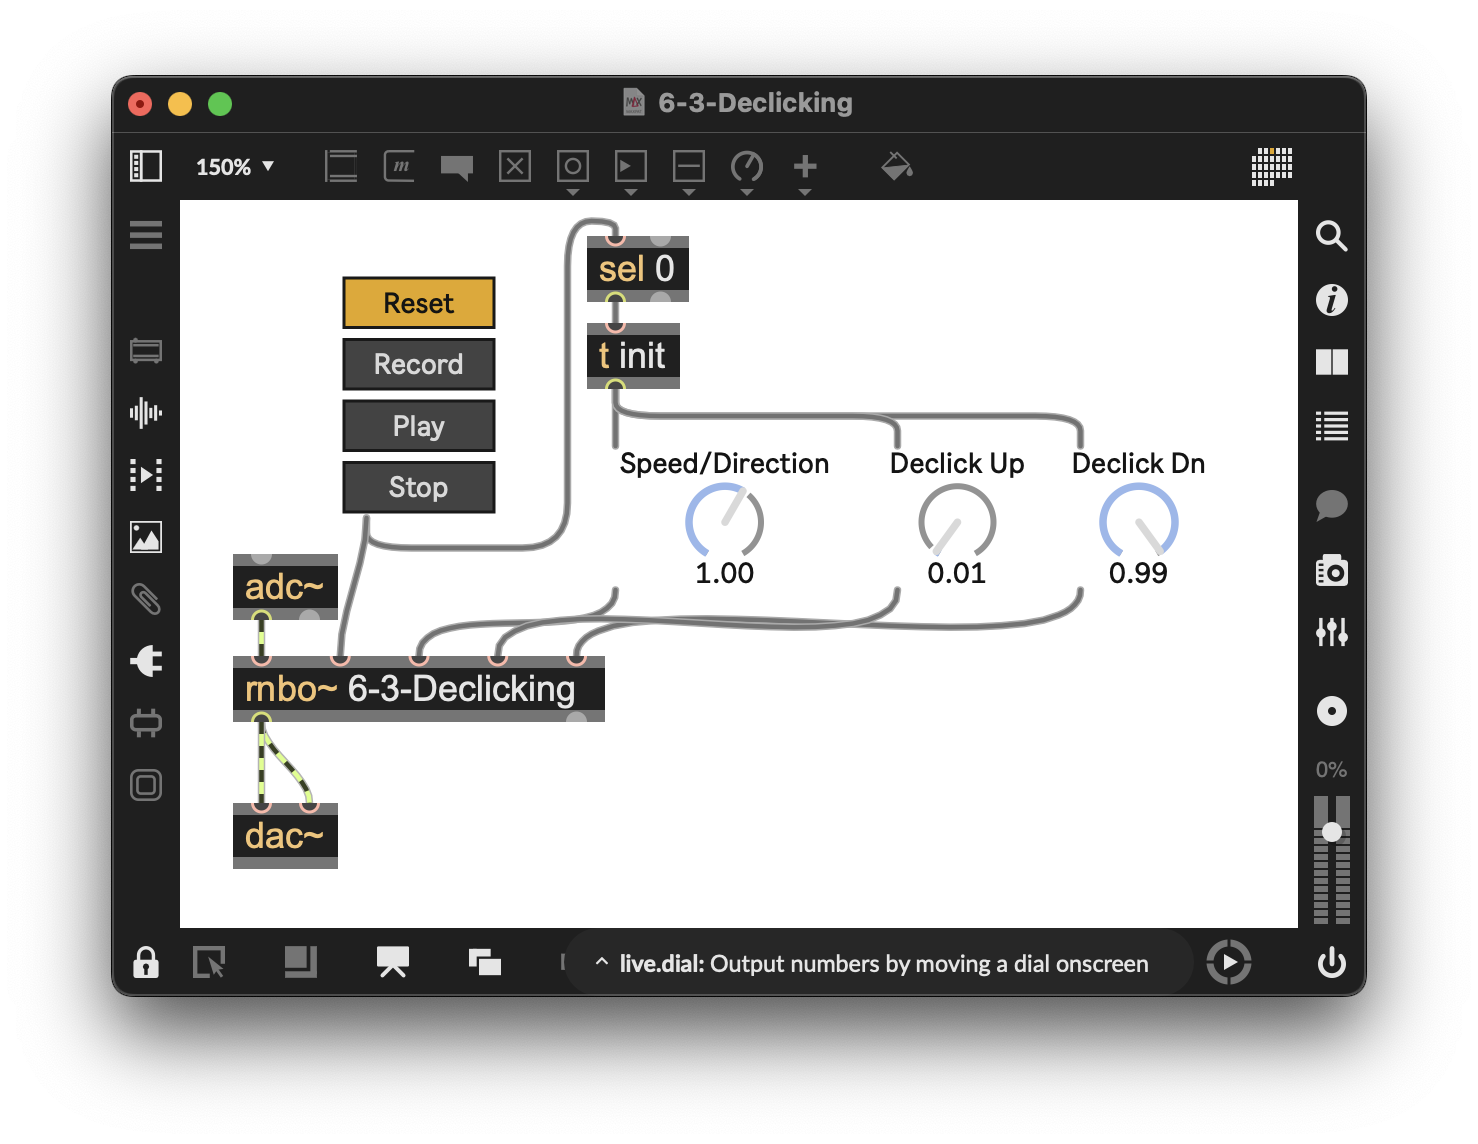
Figure 6-06
So far…
(Example Patcher: 6-4-So-Far)
We have now created a single-track looper in rnbo~ with record and playback capabilities. To extend our patcher’s functionality, we can create multiple instances of this looper patcher and use them as asynchronous loopers, offering new and interesting musical possibilities.
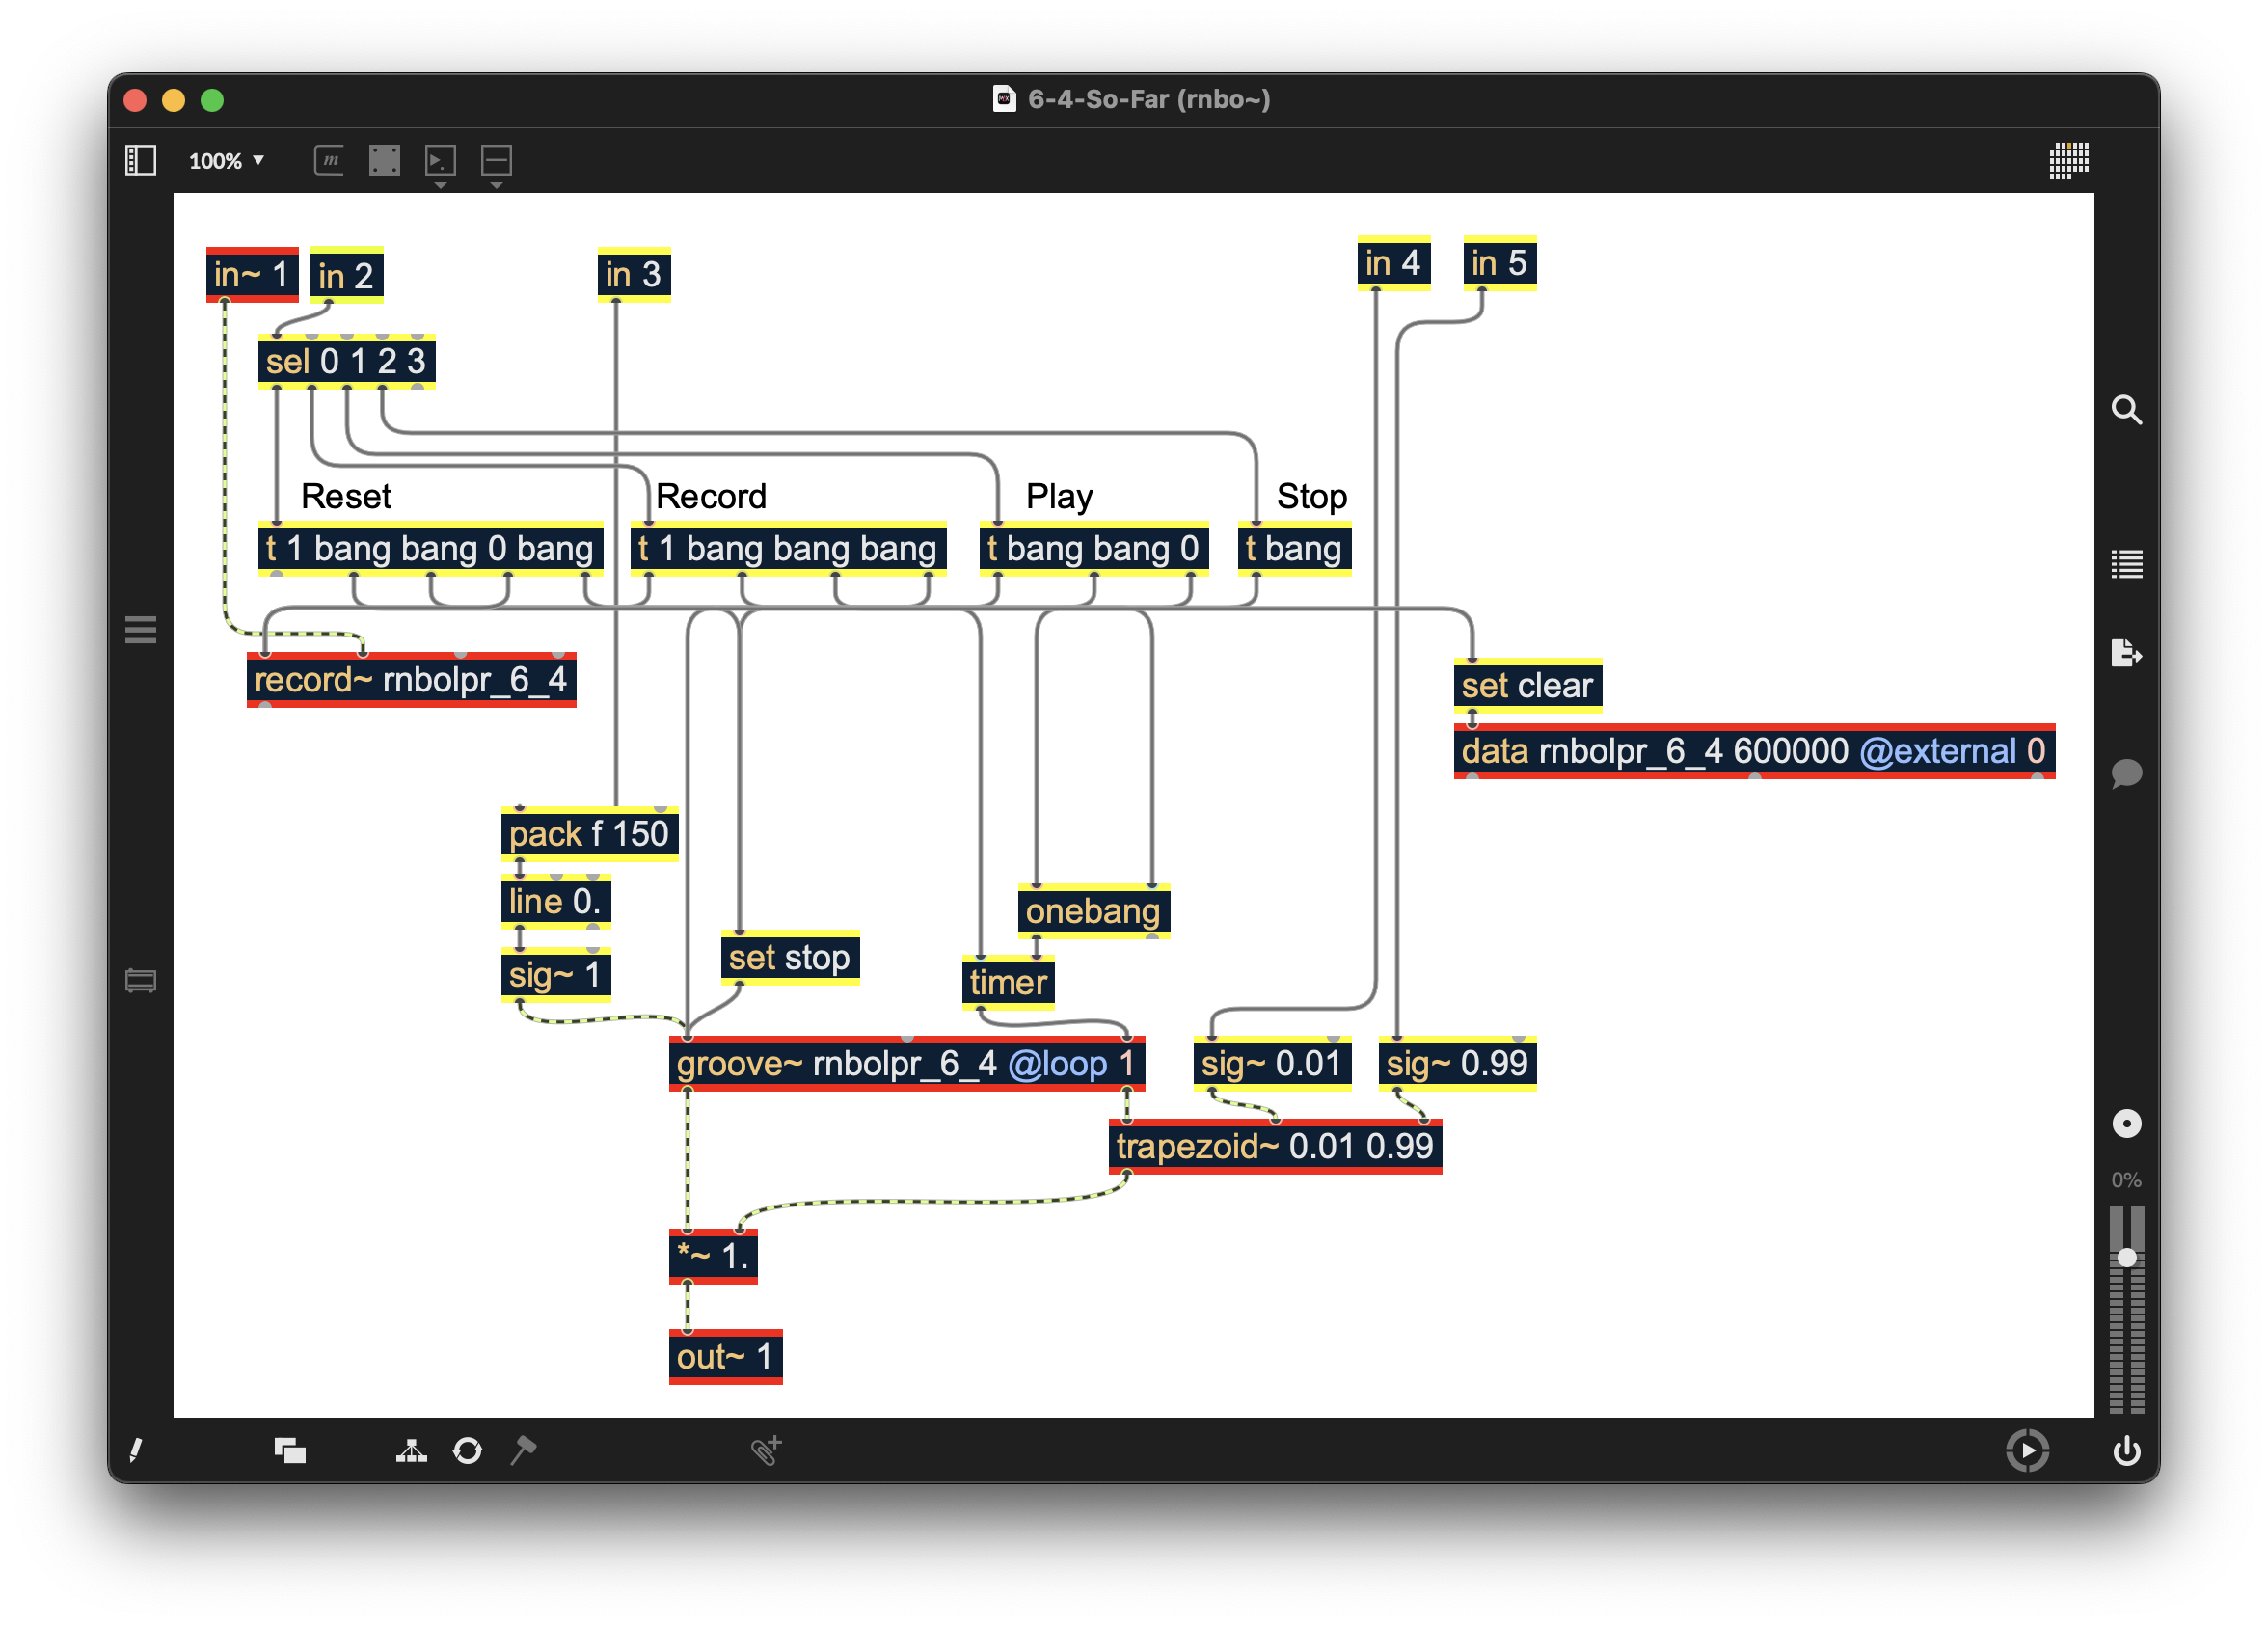
Figure 6-07
How might we modify our patching to create a multitrack asynchronous looper in rnbo~?
To create our multitrack asynchronous looper, we’ll use the rnbo~ equivalent of a technique you’ll recognize from the Max world — we’ll create a series of abstractions (patchers that will load as subpatchers into our rnbo~ patcher) that share information to allow them to synchronize.
Using Abstractions and Synchronization
(Example Patcher: 6-5-Abstraction)
To create our patcher abstractions, we’ll begin by making a few changes to the rnbo~ patcher we have just created— a simple change to the record~, groove~, and data operators, as shown.
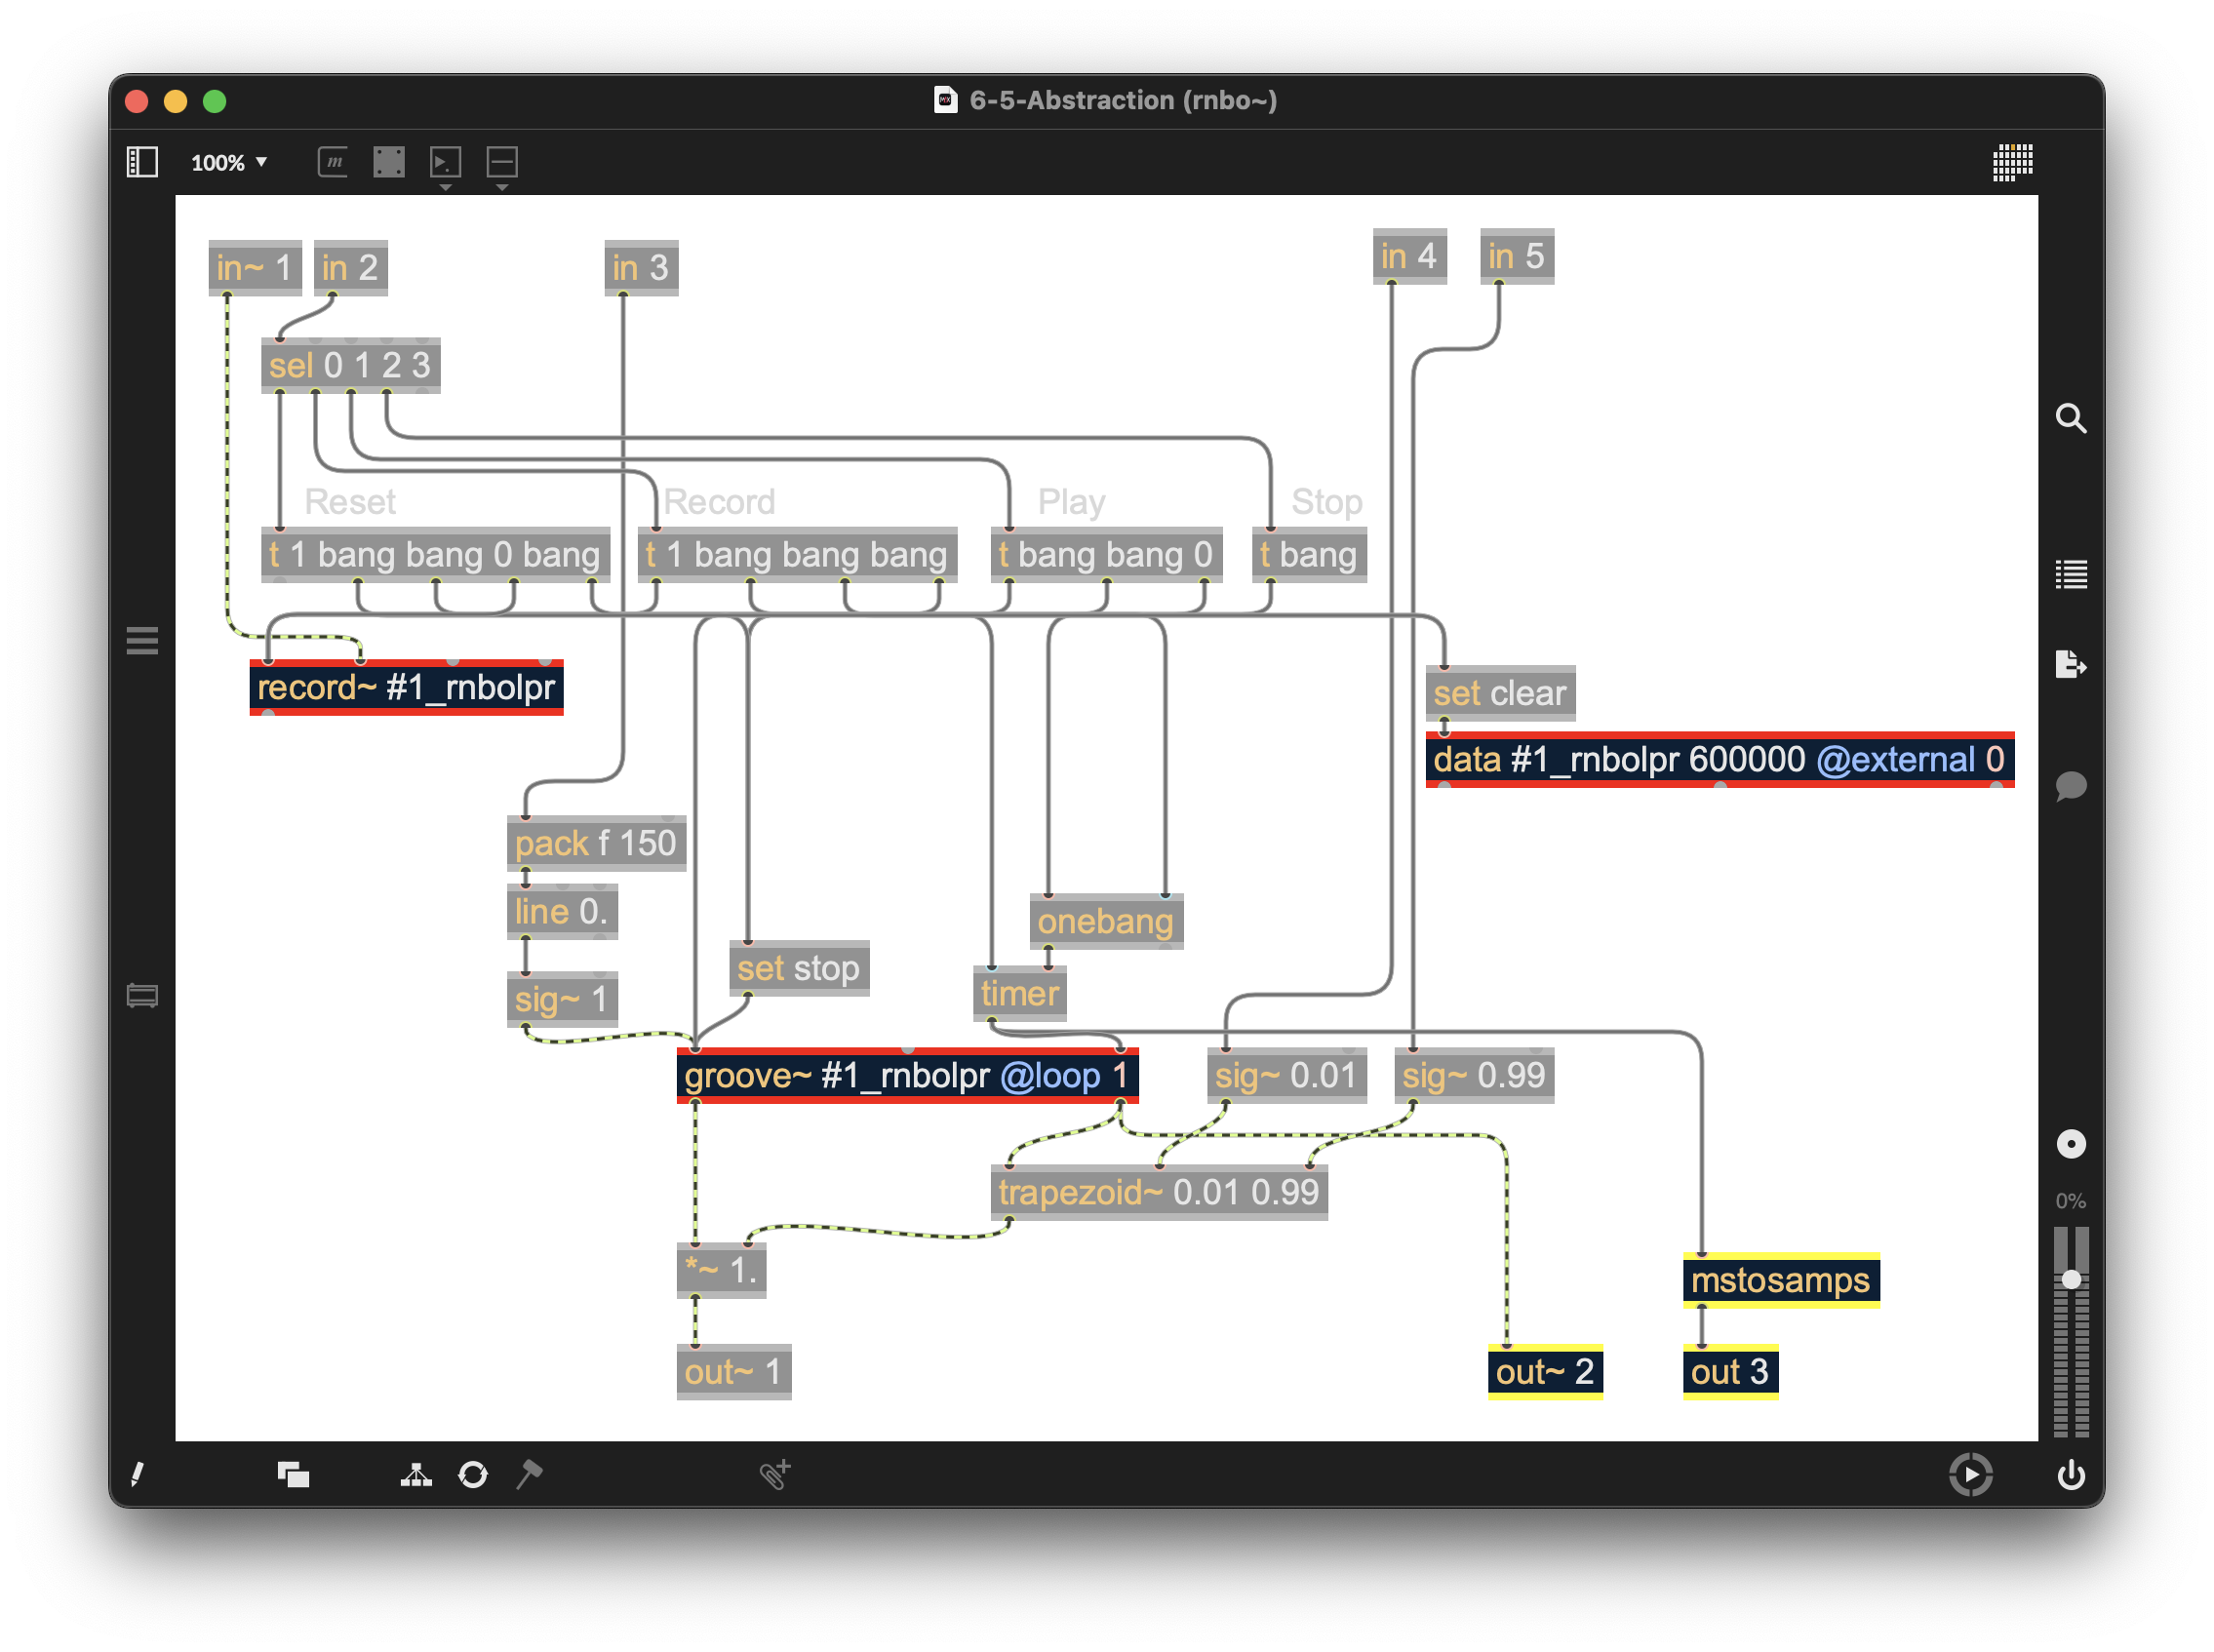
Figure 6-08
We’ll change the first argument to all three operators to include the character string “#1_” in the names of the three operators. As we will see in a moment, this name change will allow us to add a unique name when we insert the resulting abstraction in a subpatcher using an @args attribute. More on this in a moment.
In addition, we have added an out~ 2 operator for the sync outlet from the groove~ operator and an out 3 operator for the endpoint of our loop. We’ll use both outputs to hand off to our secondary abstractions, aligning the playback location and loop endpoints.
We’ll save this file with the name 6-5-Abstraction.rnbopat from within our rnbo~ patcher. (Since we have saved it in the same folder as our patcher, loading it as an abstraction is easy.)
Now that we’ve saved our abstraction, we can add a new object p @file 6-5-Abstraction <name> to our patcher, where <name> is unique (we’ll use Peter, Paul, and Mary for our names here). This will load the file into a rnbo~ subpatcher as an abstraction with the @args adding the name “Peter” to our groove~, record~, and data operators. We can do this as many times as our computer allows, with each uniquely named version sharing its own groove~, record~, and data operators.
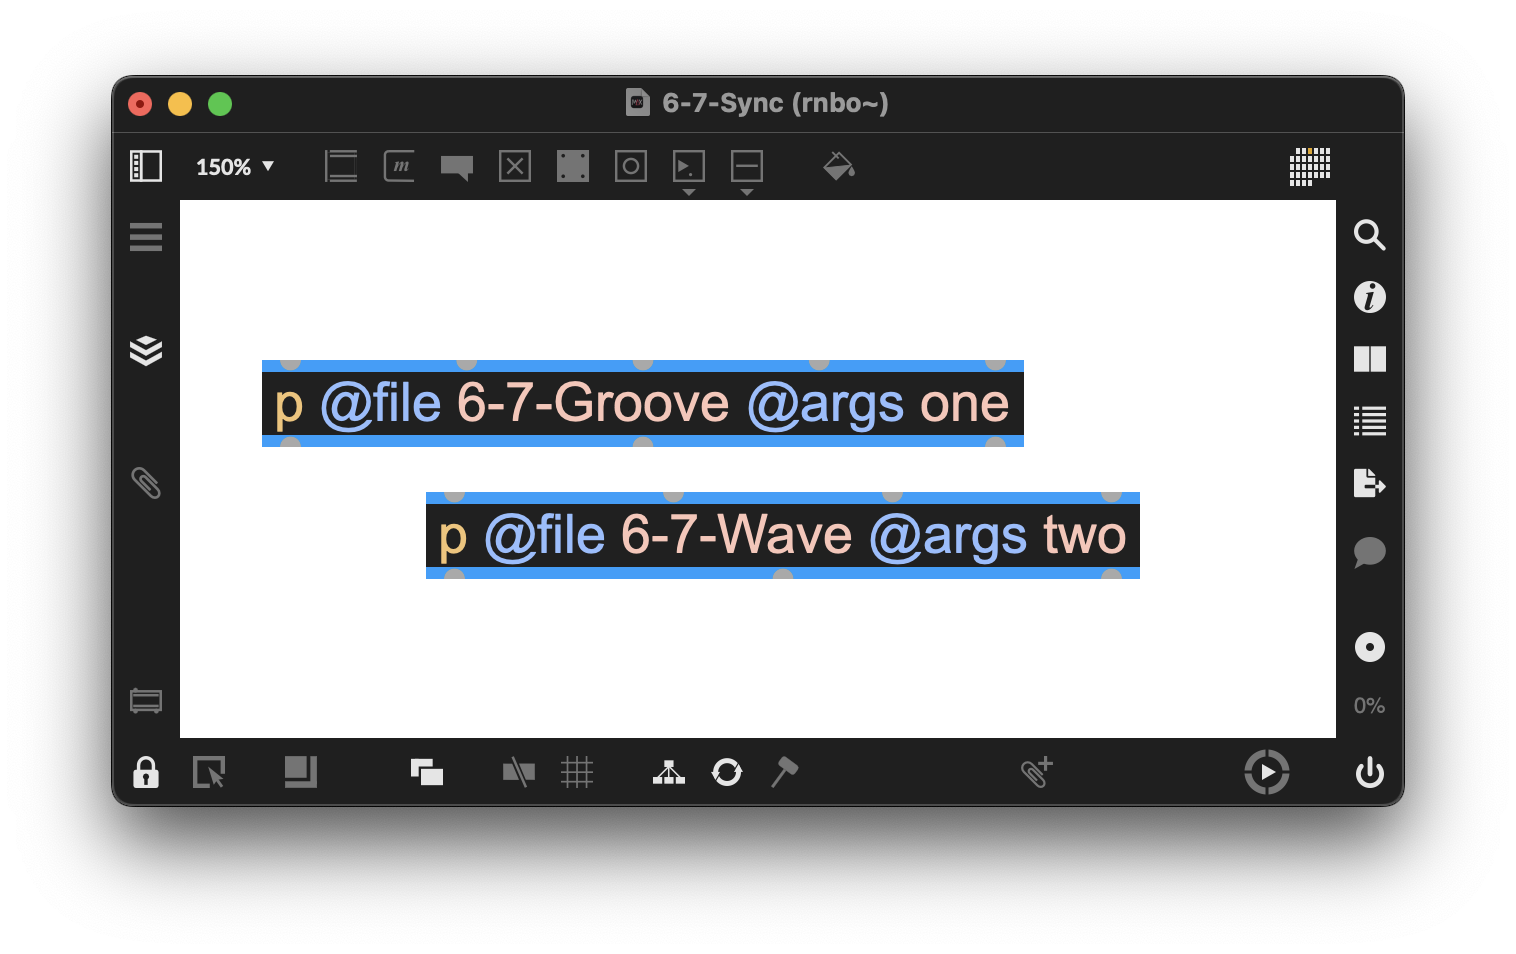
Figure 6-09
You’ll notice that our abstractions have the same configuration of outlets and inlets. If we double-click them in a locked patcher, they will open and display the patcher.
This is a great way to create reusable patchers. Editing any abstractions will change the contents of all the other abstractions with the same name.
Secondary Loopers Using wave~
(Example Patcher: 6-6-Wave)
Our multichannel looper requires that we use one of our abstractions as the primary looper and synchronize any other loopers we add. These secondary loopers differ from our primary looper in that they use the wave~ operator for playback, which facilitates working with endpoint and sync information from our primary patch. The challenging part of this patching lies in getting the record~ to start at the beginning of the loop and end with the shared endpoint, which keeps everything in alignment. The core elements in the patcher below are similar to those we have used before, but the differences lie in the message ordering. Here is what is happening with reset, arm/record, play, and stop sequences:
For “reset,” we send the following messages in order (reading from right to left in the trigger operator:
- Close the second gate operator used for arming/recording (more on this later)
- Close the first gate used for arming/recording
- Close the selector~ operator that sends the sync signal to our wave~ operator for playback
- Disable record~
- Send a bang message to the set to clear the contents of the data operator
Setting arming/recording requires a somewhat more complex set of ordered messages:
- Open a gate which
- Waits for and receives a bang message at the beginning of the loop (from the combo of delta~, <=~, and edge~ operators), this bang message then uses a trigger (t) object to;
- Turn off the selector~ for playback
- Send a bang message to a set object, which clears the data object’s contents
- Send a value of 1 to turn on a “Recording On” notification and enable recording.
- Open the next gate
- Close the current gate
- When the next gate is opened, it waits for and receives the bang message at the beginning of the loop, using a trigger (t) object to:
- Send a value of 2 to the main UI to set its display to Play
- Sends a value of 0 to turn off the “Recording On” button in the display and turn off recording
- Opens the selector~ object so that the wave~ object starts playback
- Closes itself.
- Waits for and receives a bang message at the beginning of the loop (from the combo of delta~, <=~, and edge~ operators), this bang message then uses a trigger (t) object to;
See, easy! Well, a bit complicated. Let’s put it together in our next patcher.
Synchronizing Secondary Loopers
(Example Patcher: 6-7-Sync)
For this patch, we have indicated primary and secondary looper abstractions by name: the main abstraction with groove~ (saved as 6-7-Groove), and the secondary wave~-based abstraction (saved as 6-7-Wave). They are loaded into the main patcher as rnbo~ subpatchers and given unique names with the @args argument. We take sync and endpoint information from the main into the secondary abstraction to manage the connections between the primary and secondary loopers. We have also added an in~ 1 object for the audio that goes to both abstractions and other inputs required for each function.
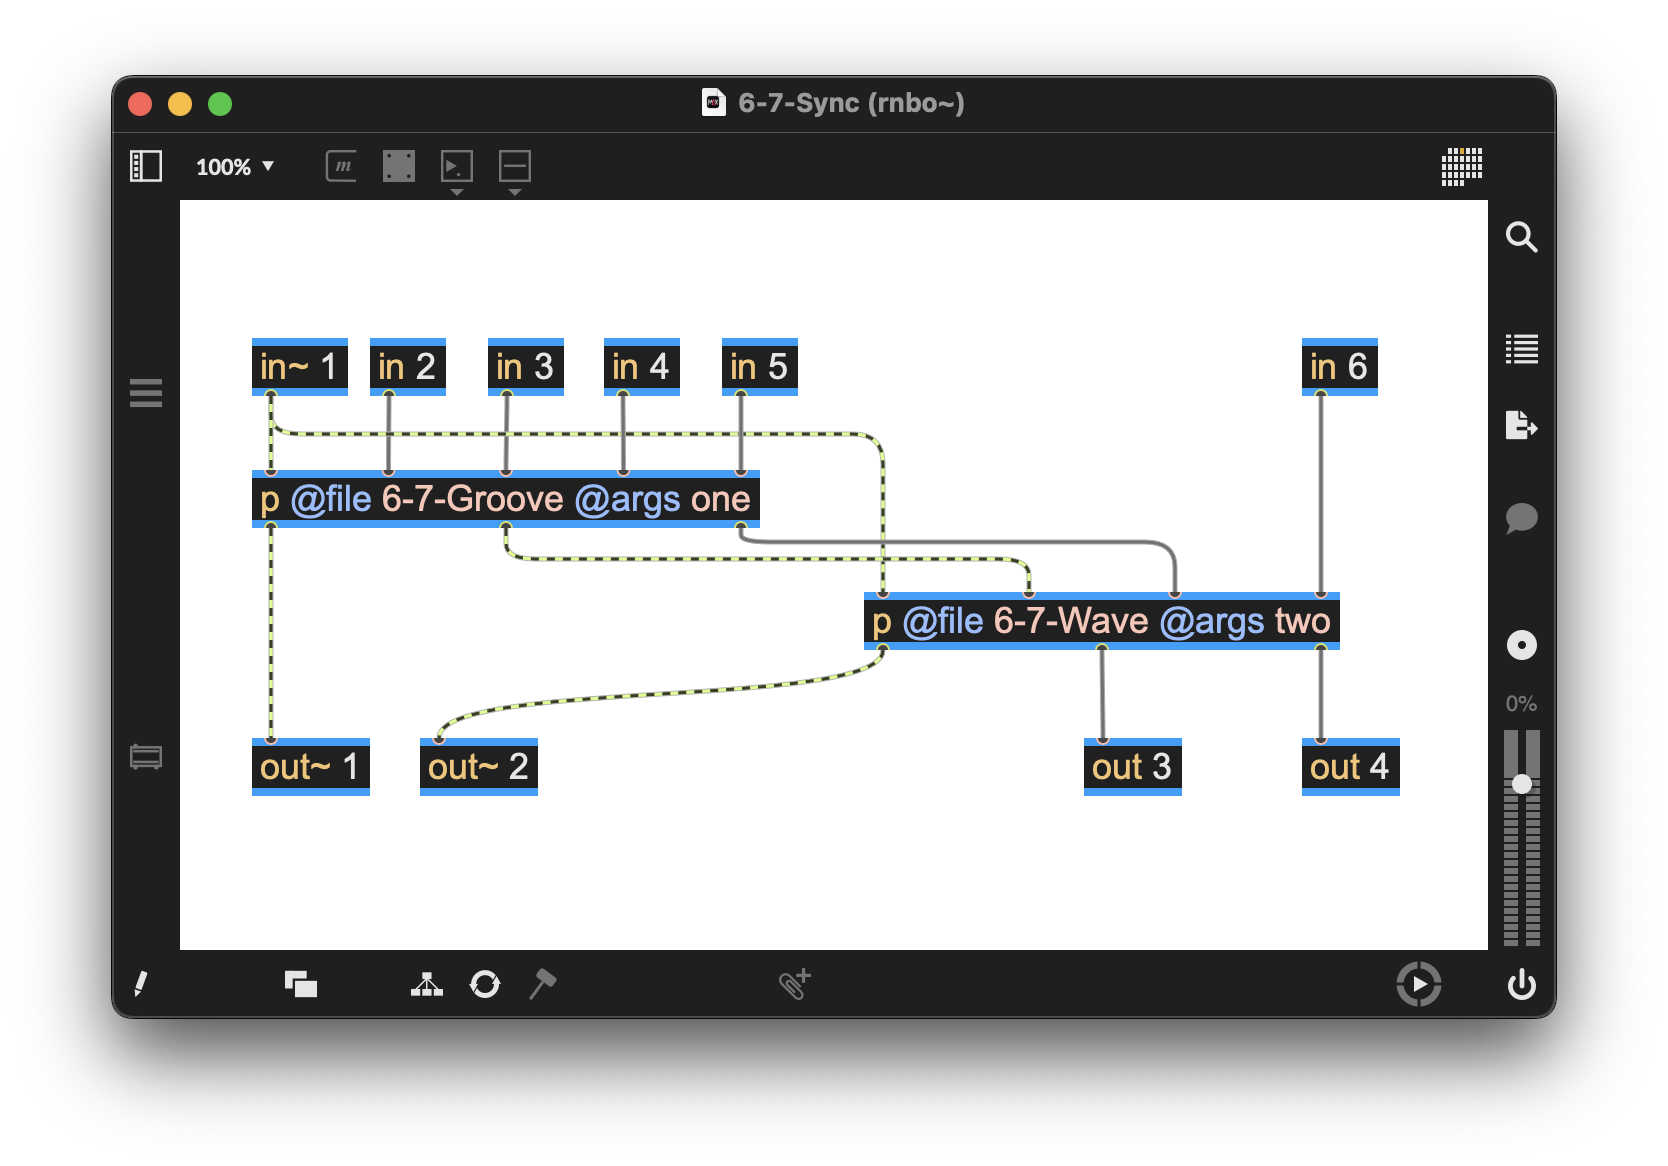
Figure 6-10
The result has been saved and reloaded as the rnbo~ 6-7-Sync object. Here is what it looks like in the parent patcher:
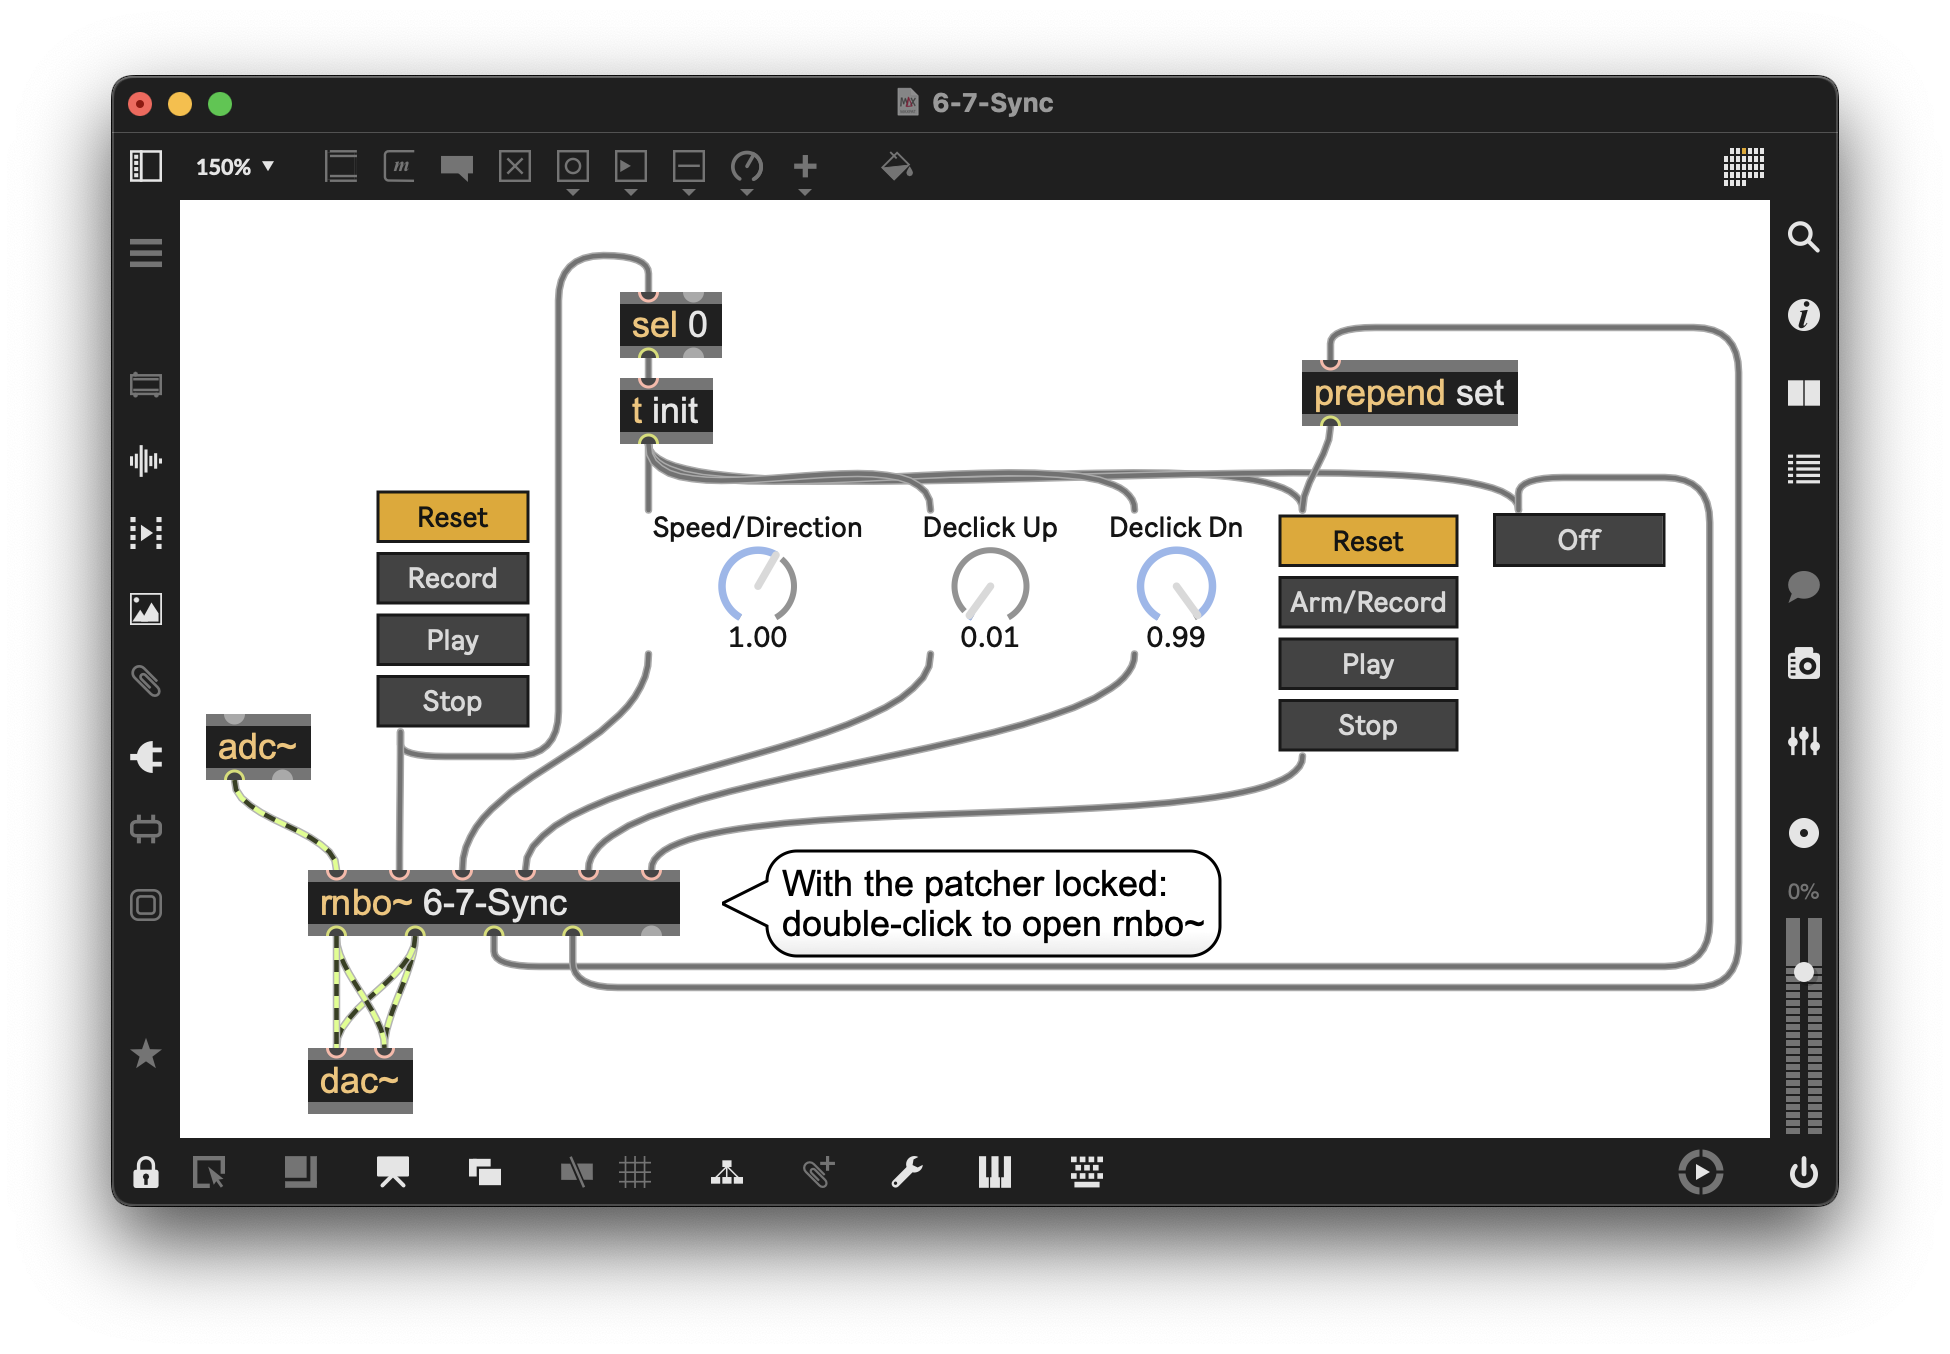
Figure 6-11
Adding a performance UI
(Example Patcher: 6-8-Performance-UI)
One of the best reasons to use abstractions in your patching is that they create an easy way to expand the resources used in your final patcher. For the final patcher in this chapter, we will make a four-track Multitrack Looper. However, using abstractions for the secondary loopers means that it is easy to expand the patch for as many secondary loopers as you’d like—each of which can be spatialized differently, have different audio effects, mixes, and so on.
A rnbo~ four-track looper patcher looks like this:
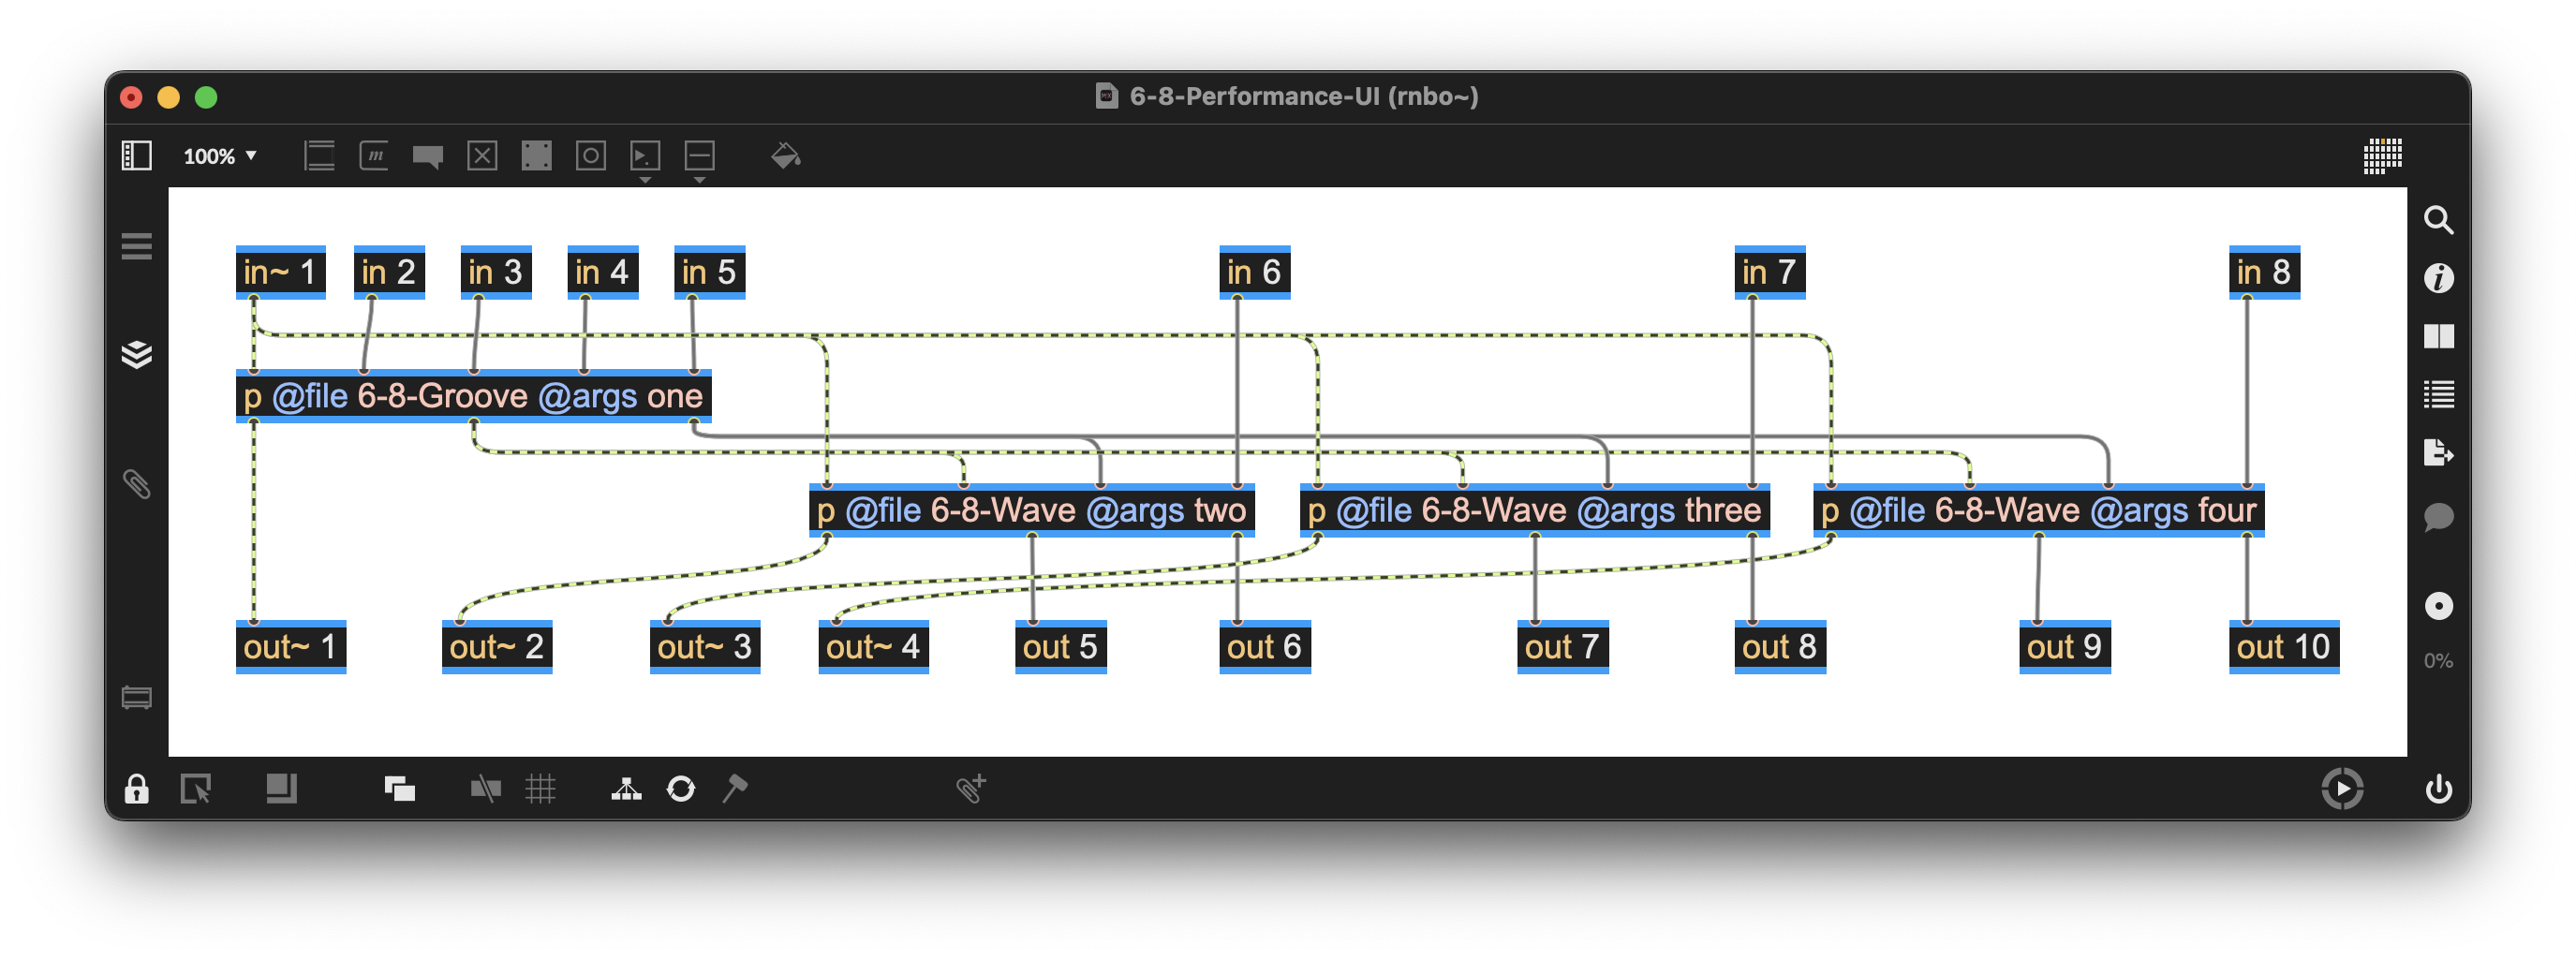
Figure 6-12
You’ll note that we have assigned unique names to each of the secondary looper patchers and added the necessary in~ and out~ operators. The result has been saved and reloaded as the rnbo~ 6-8-Performance-UI object. Here is what it looks like in the parent patcher. (While the UI connections appear a little busy, imagine how much more complex this would be if we were handling all the messaging at this level of the patcher!)
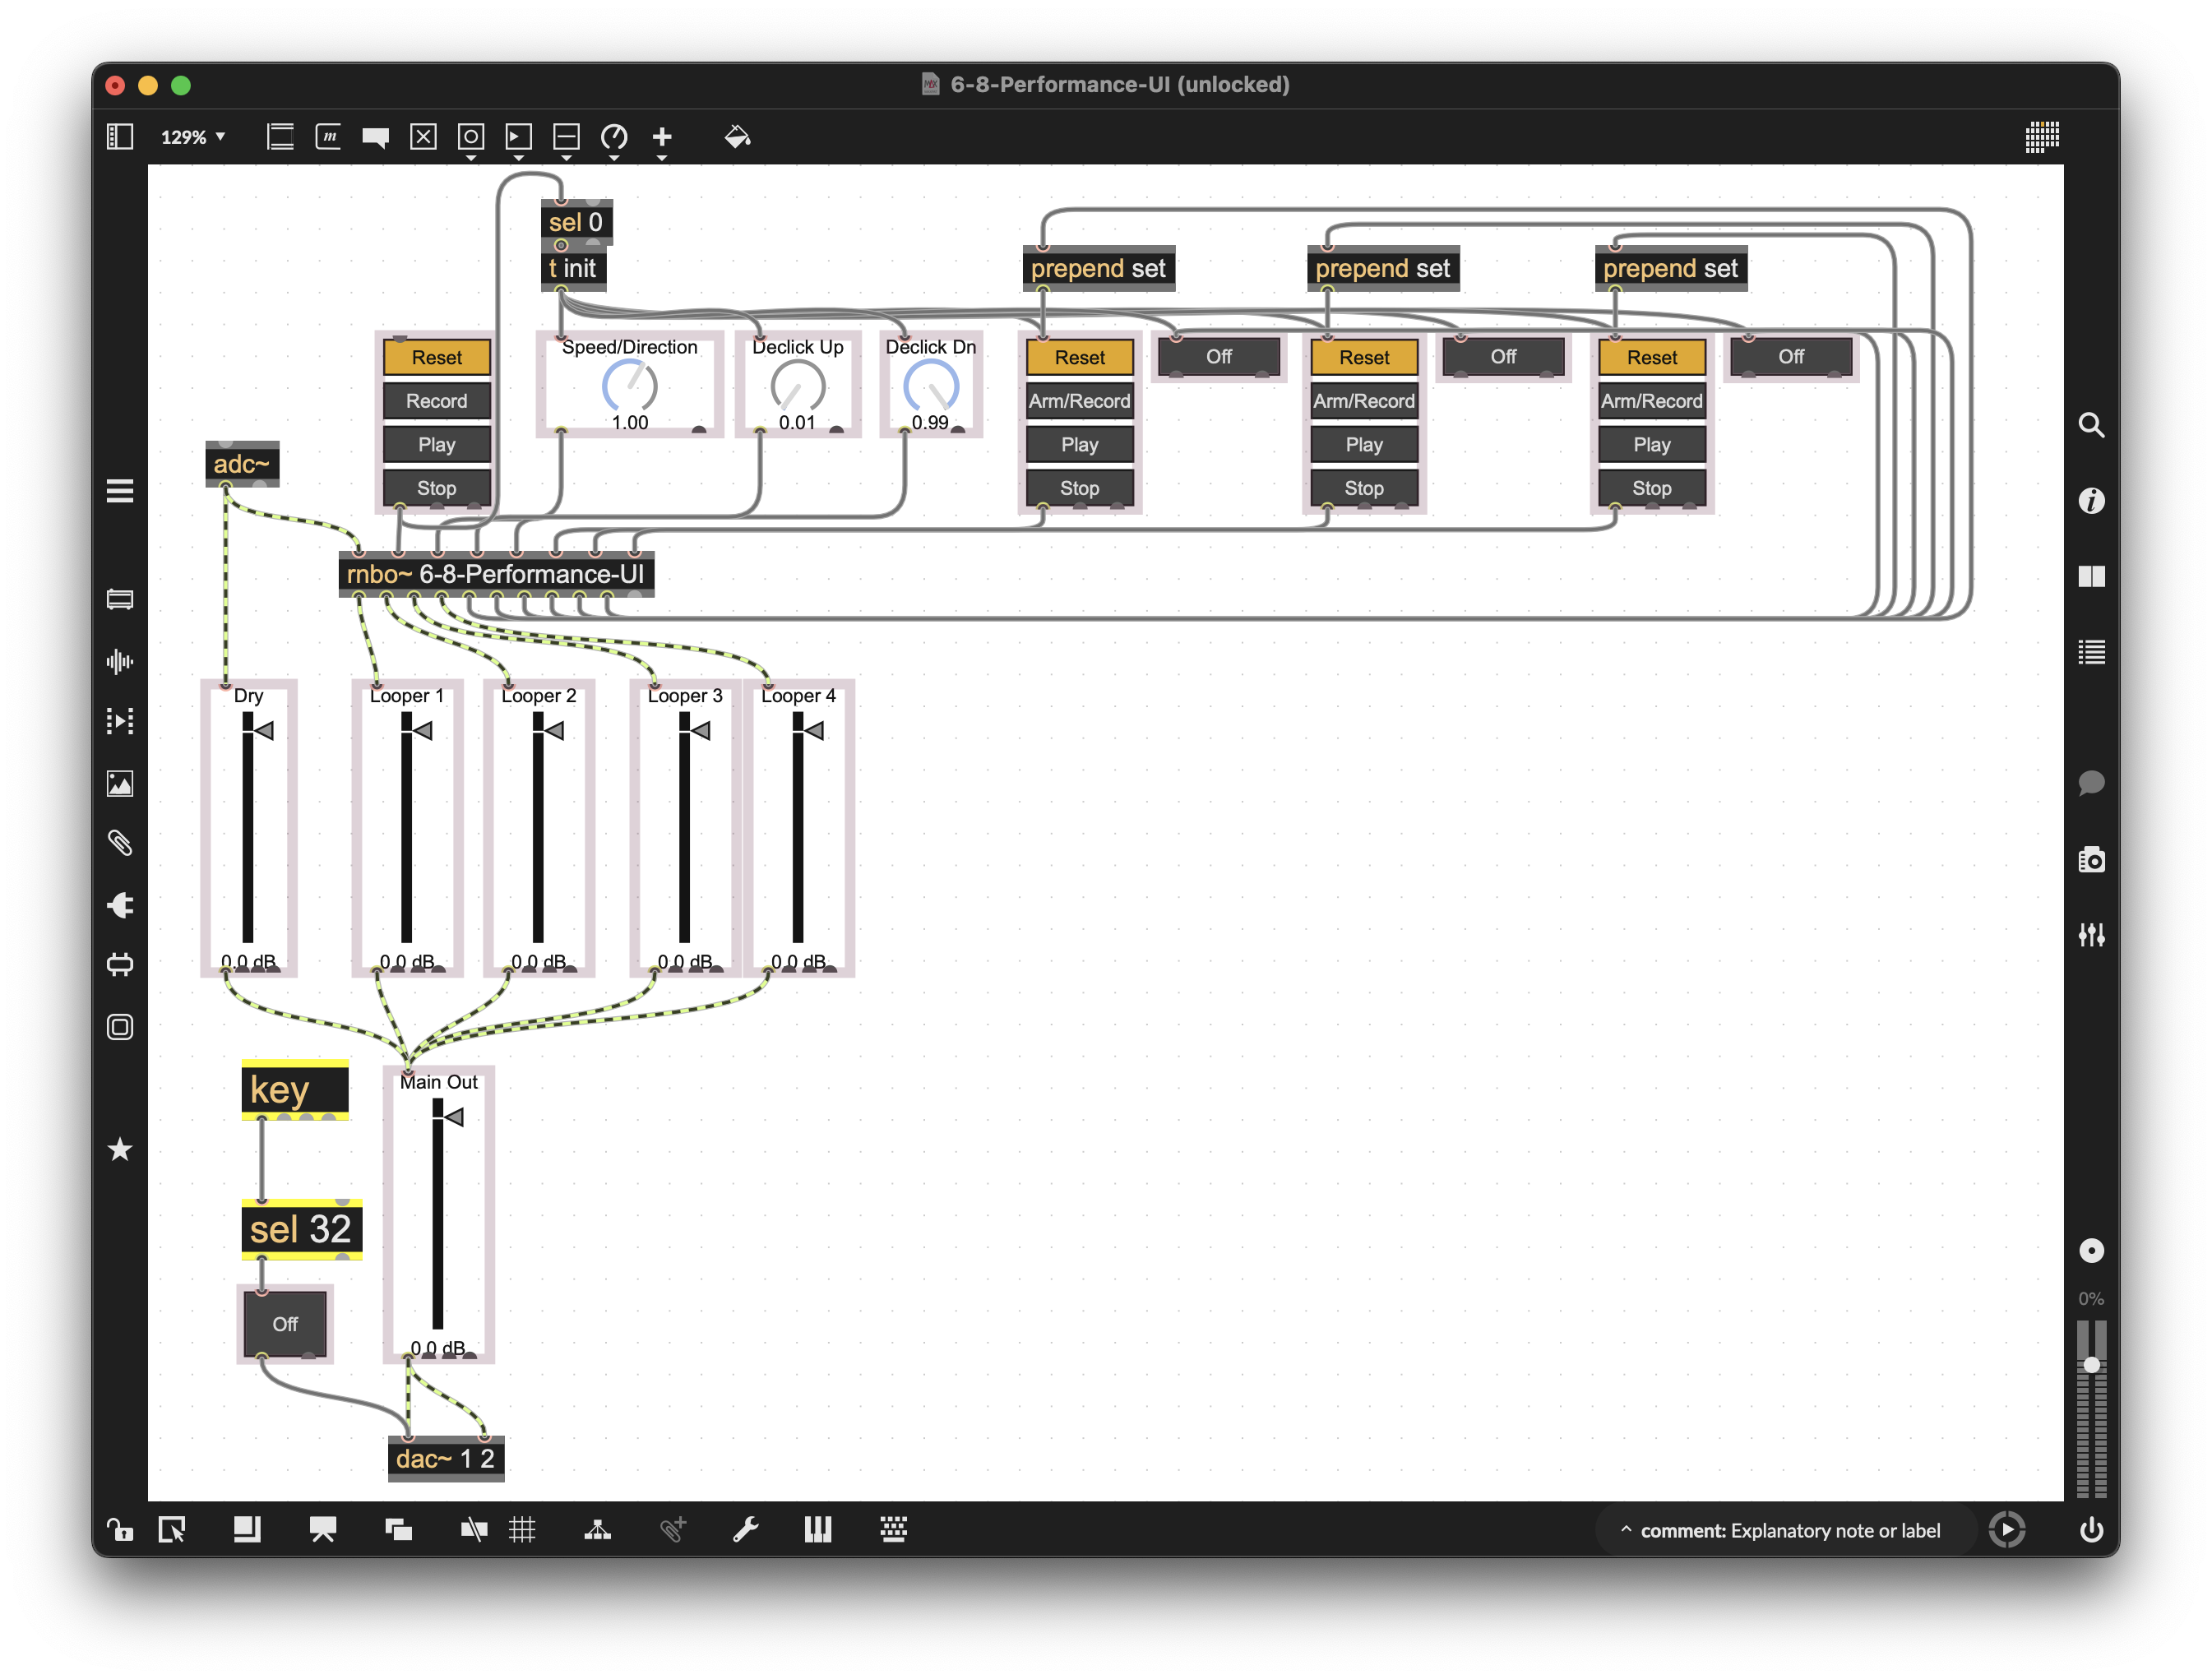
Figure 6-13
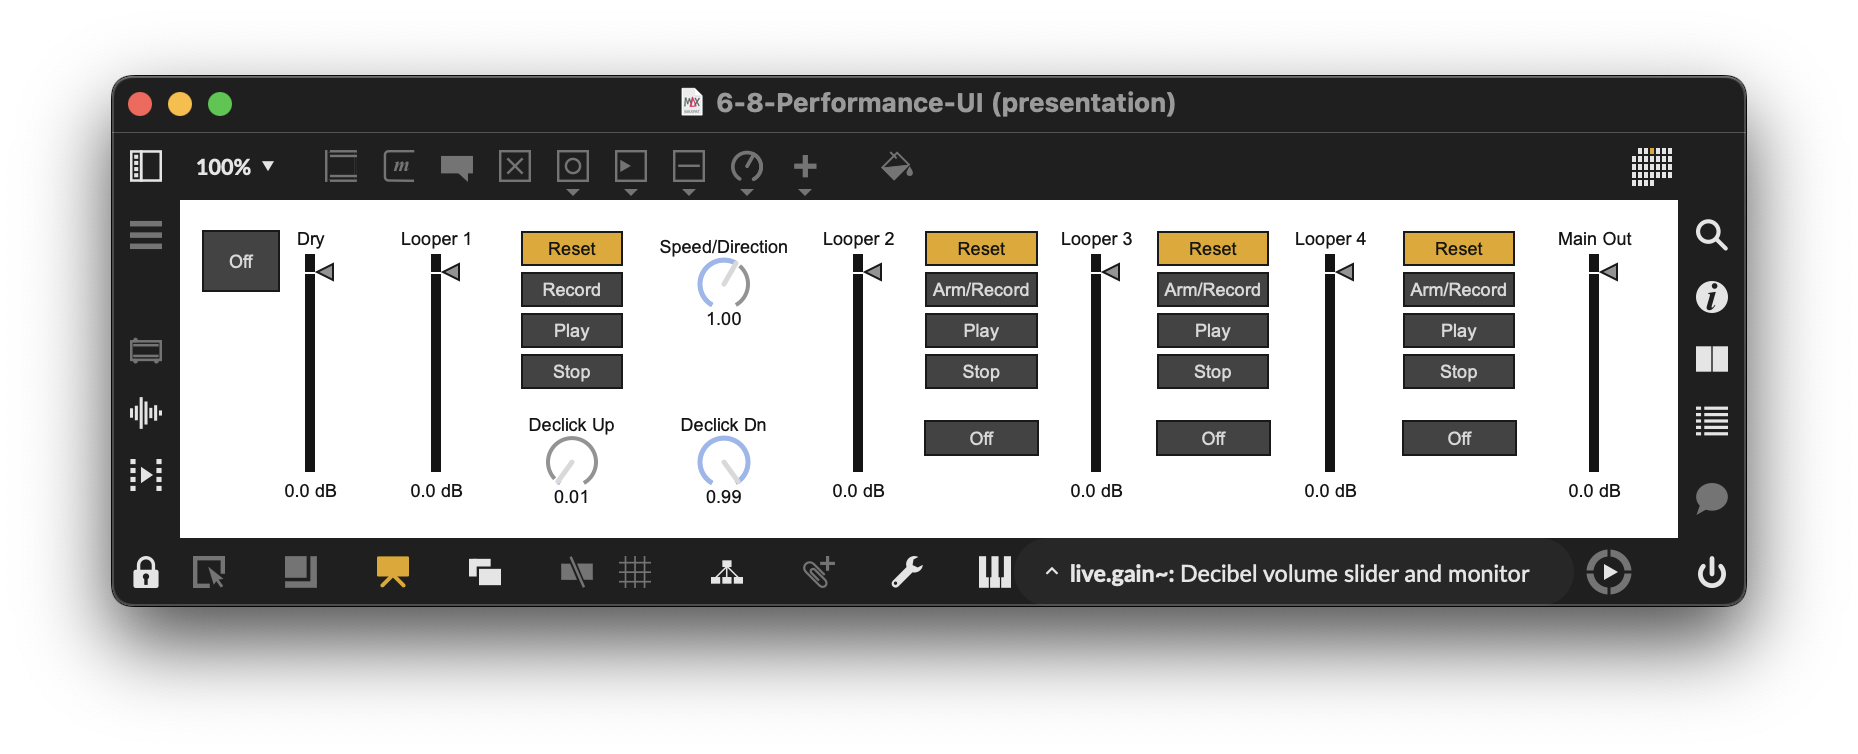
As with our earlier patchers, you’ll notice the telltale salmon-colored outline that indicates that the Live UI objects have been added to Presentation Mode. Here’s a final layout that is organized in a meaningful way (you may have your own ideas for organizing your UI, of course).